This chapter describes the steps required to create a new Planned Work instance.
From the IMS Main Menu:
1 |
Click on the Planned Work icon option |
2 |
Select the Create new option from the PlannedWorkForm Actions button bar |
3 |
Which opens up the Create new PlannedWork popup window |

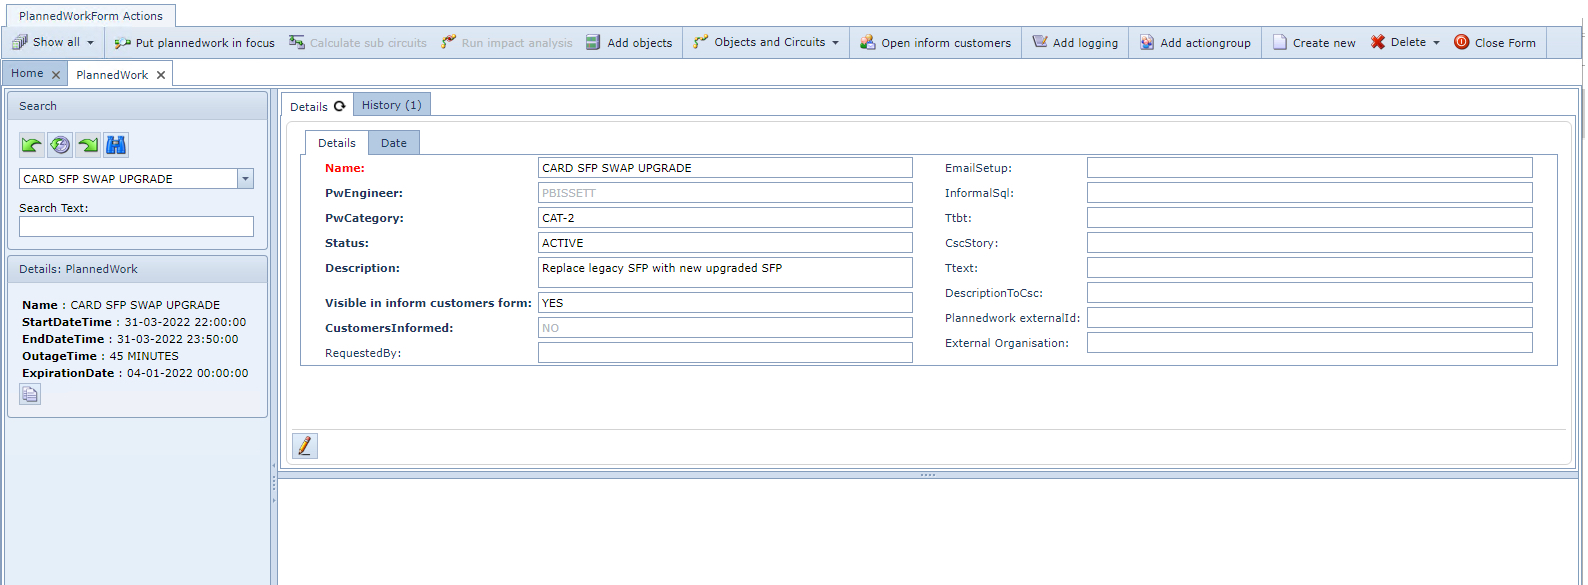
Fill in the fields required in the first tab called Details, in particular the mandatory ones highlighted in bold text.
The following table describes all the fields in the Create new PlannedWork popup window:
Name |
The name of this new Planned Work instance |
PwEngineer |
The name of the person logged into IMS running this Planned Work instance |
PwCategory |
A customer service impact severity level measure - defaults are CAT-1 to CAT-4. These categories are configurable with the assistance of VC4 engineers to capture rules for, say, no concurrent Planned Work CAT-1 instances can be run at the same site for fear of disrupting backup routes for affected services. For further information on categories please contact VC4. |
Status |
Three options available to describe the current state of a Planned Work instance. Options are: Active, Canceled, and Closed. These status indicators are for descriptive purposes only. |
Description |
A free form text field of information to best describe the overall function of a Planned Work instance i.e., Fibre upgrade to access site. |
Visible in inform customers form |
Option for this Planned Work instance to be available for selection from the Inform Customers form. Options: Yes, No. |
CustomersInformed |
When a Planned Work instance has been carried out and customers have been notified, then this field is auto-populated with Yes. |
RequestedBy |
Free form text field to describe person, group, or third party system that initiated this Planned Work. |
EmailSetup |
Select from a drop down list any available Email Setup instance to be incorporated into this particular Planned Work. |
InformalSql |
SQL script to search for specific Contacts for the Planned Work to send emails to |
Ttbt |
Other system's Trouble Ticket name |
CscStory |
Other system's Customer Service Centre Story (details) |
Ttext |
Other system's Trouble Ticket text field |
DescriptionToCsc |
Other system's Customer Service Centre comment |
Plannedwork externalId |
Other system's Planned Work ID |
External Organisation |
Other system's organisation |
In the second tab called Date, fill in the date and time related data that will apply to this Planned Work:
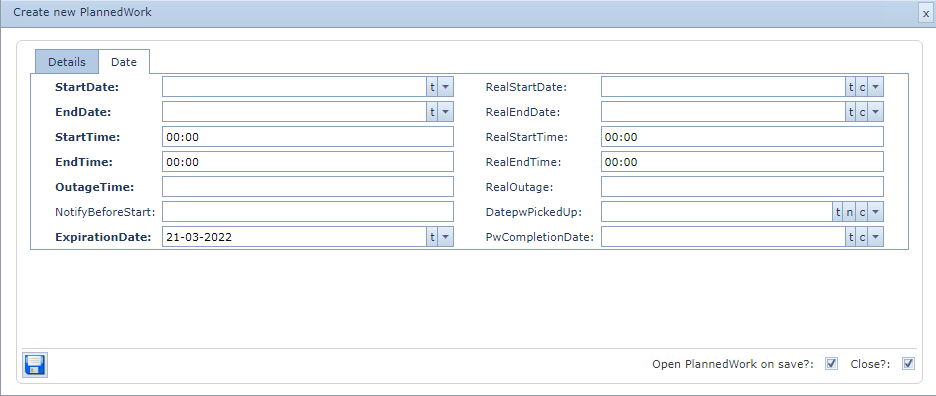
The following table describes all the fields in the Create new PlannedWork popup window's Date tab:
StartDate |
Enter the desired start date for this Planned Work to begin |
EndDate |
Enter the desired end date for this Planned Work to finish |
StartTime |
Enter the start time for this Planned Work to begin |
EndTime |
Enter the desired end time for this Planned Work to finish |
OutageTime |
Projected outage time - free alphanumeric field describing the duration the network object will be acted on causing the outage - i.e., "1 HOUR", "30 MINS" |
NotifyBeforeStart |
Optional administrative type field for additional information |
ExpirationDate |
Optional administrative type field for additional information |
RealStartDate |
This is the actual start date and not the planned start date |
RealEndDate |
This is the actual end date and not the planned end date |
RealStartTime |
This is the actual start time and not the planned start time |
RealOutage |
This is the actual outage time and not the planned outage time |
DatepwPickedUp |
Optional administrative type field for additional information |
PwCompletionDate |
Optional administrative type field for additional information |
Once the above form has been completed,
▪Click on the Save icon in the lower left corner of the popup window
This will reveal the newly created Planned Work instance, as shown in the following screen shot:
Add Objects
The next step is to add the necessary object or objects to this Planned Work. This is accomplished by:

▪Clicking on the Add objects icon option in the PlannedWork Actions button bar
This will reveal the Add objects popup window, as shown in the above screen shot.
▪Select the IMS object or objects from the various available drop down fields presented in the popup window.
In this case a Card is selected, which then populates the lower half of the Planned Work form with any affected Circuits.
Remember that the Planned Work feature's goal, is to reveal Circuits that could be impacted by work carried out in the network. It could be the case that a Planned Work on an IMS network object may not affect any Circuits, if this is the case then the lower half of the form will be blank.
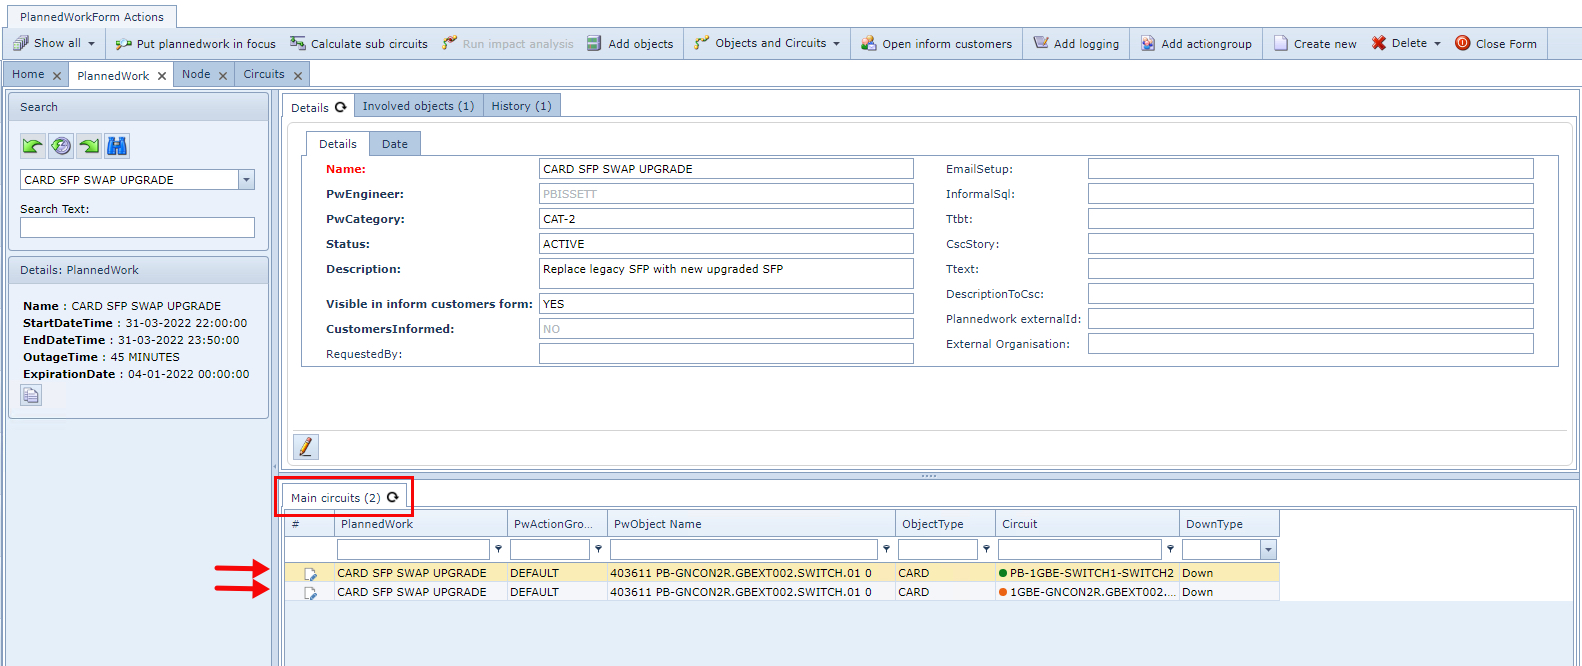
Once an IMS network object or objects are added to the Planned Work, IMS may reveal Circuits that are in some way related to that object, in this case a Card, as shown in the Main Circuits tab in the above screen
shot.
In the above screen shot we see two carrier circuits are listed. By default, IMS will place the listed Circuits in a Down status as shown in the last column of the Main circuits tab.
Should the engineer wish to change the status because of a working knowledge of the network, then double clicking on the DownType field will reveal other status options as:
oProtectionSwitch
oAtRisk
oImpact
oNoImpact
The next step to follow is to know if there are any Sub Circuits affected by the Planned Work.
Calculate Sub Circuits
The next step is to obtain a list of any potential affected Sub Circuits. This is accomplished by:
▪Click on the Calculate sub circuits icon option in the PlannedWork Actions button bar
Should there be any related Sub Circuits, then these will be listed in a new tab called Impact per group.

The next step then is to run the Impact Analysis.
Impact Analysis
The next step is to run the Impact Analysis to obtain a definitive list of what Circuits are affected (down) and which ones are protected. This is accomplished by:
▪Click on the Run impact analysis icon option in the PlannedWork Actions button bar
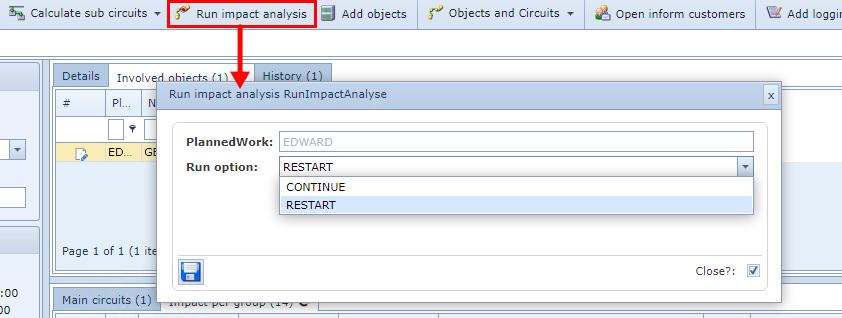
This opens up the Run impact analysis popup window.
▪Click on the down arrow icon in the Run option field
▪Select Continue or Restart from the dropdown list
The Continue option is typically used when an Impact Analysis has already been run and a new IMS object/s has just been added to the Planned Work which now requires an Analysis to be applied on the newly added item/s only. |
The Restart option will run the Impact Analysis on all IMS objects listed in the Planned Work |
This will produce a refreshed list of any affected Sub Circuits in the Impact per group tab but with additional information in the DownType column. In the following screen shot there are some Circuits showing that in the event of the Planned Work going ahead, these will not be impacted as they are protected Circuits.
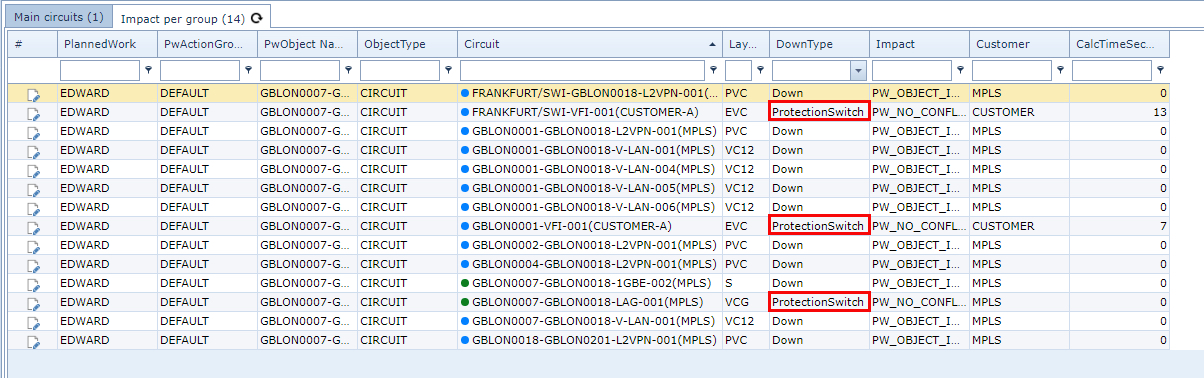
It's important to note that not all the Circuits listed above will have a notification sent to the related customers. A notification will not be sent to related Customers whose Circuits are:
➢in a Planned status
➢in an In Service status and are protected