Introduction to Rack Frames
Frames can be created to nest inside racks. Frames cannot be created on their own, they are a subset of the rack object, therefore they can only be added to Racks.
In IMS, if a rack contains a frame, it will only be of two modes: ETSI and 19 inch. When modifying the frame details at creation time, the frame's field called Position Count (number of RUs) will automatically calculate the new frame's height and width (in millimetres). These are in accordance to accepted standards within the industry.
More than one frame can be added to a rack - their rack mode (Nineteen Inch or ETSI) as well as the RU (Rack Unit) sizing field will determine how and where these frames fit in a rack.
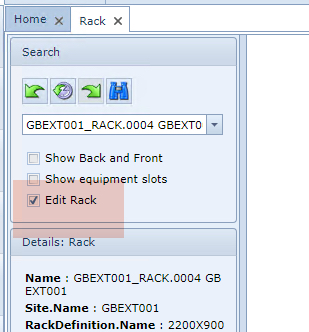
If the Rack option called Edit Rack is enabled (found in the Search area), then rack objects like nodes and frames, can be dragged around inside the rack to readjust location.
Nodes can be added to frames as well as racks i.e., a shelf/node can be added to the rack whilst another shelf/node can be added to the rack's frame.
If a Frame is added to a Rack, the Rack's side numbering disappears and the Frame/s will contain the numbering scheme as in the following screen shot:

Frame detailed information is viewed in its respective sub Tab form, within its parent Rack's Items in Rack tab:

Adding a Frame to a Rack
From an existing Rack instance
▪Select the New option from the Rack Actions button bar
▪From the drop down list, select Rack Frame
This open up the Add Rack Frame popup window.
Fill in the required fields of information - especially the mandatory ones
▪When done, click on the Save icon in the lower left corner of the popup window. This will place the Frame in the Rack
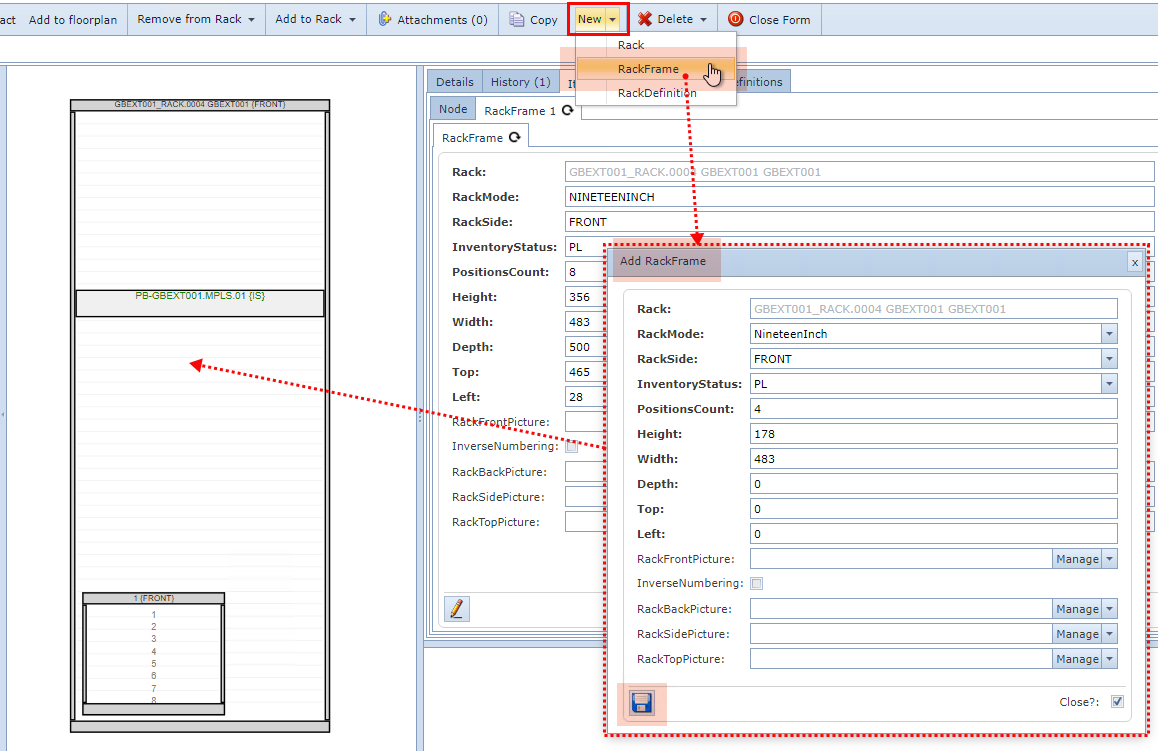
In the above screen shot you will notice there is a rack Frame already within the Rack, in the lower left corner.
To re-position the Frame within the Rack:
▪Click on the Edit Rack check box in the Search area
▪Left Click on the newly added Frame and drag it to the required position within the Rack
Rack Frame Form Fields
Each Frame in a rack will belong to its parent Rack instance, and therefore the Rack name will be auto-populated.

Rack |
Parent Rack object (auto-populated) |
Rack Mode |
Options: 19 Inch or ETSI |
Rack Side |
Options: Front, Back - should the Frame have a front and back |
Inventory Status |
IMS list of 6 available object statuses |
Position Count |
This determines the size in Rack Units (RU) for this Frame |
Height |
Calculated automatically by the Position Count value - rack standards based |
Width |
Calculated automatically by the Position Count value - rack standards based |
Depth |
Option to choose the depth of this Frame |
Top |
Position of this Frame in Millimeters from the top of the Rack |
Left |
Position of this Frame in Millimeters from the left of the Rack |
Rack Front Picture |
Option to add a graphic (JPEG) that represents this Frame's front view |
Inverse Numbering |
Check box option to show this Frame's Rack Units (RU) in descending order |
Rack Back Picture |
Option to add a graphic (JPEG) that represents this Frame's rear view |
Rack Side Picture |
Option to add a graphic (JPEG) that represents this Frame's side view |
Rack Top Picture |
Option to add a graphic (JPEG) that represents this Frame's overhead view |