This section describes how to customize (override) IMS' default screen layouts.
List of customization capabilities:
➢ |
Change the caption of a field - Caption property |
➢ |
Hide a field in a specific data layout - Visible property. This can only be done when the field is not required in the actual model |
➢ |
Disable a field from editing - Visible property This can only be done when the field is not required in the actual model |
➢ |
Set a field as mandatory - required property |
➢ |
Change the order of the fields - Order property |
➢ |
Change the layout of the fields. GuiFieldSetup property |
With the default mode it is only possible to add overrides to a data layout that are shared between an update type and an add type data layout. With a property as an Add or Update layout style, it is possible to have that property appear separated for the Add and Update data layout. |
Datalayout Permissions
In order to access and use the Customize Datalayout feature, a User Group's Permission Settings must first be enabled. This is achieved by accessing the UserGroupPermission Tab as follows:
From the IMS Main Menu:
▪Select System | Users | User Groups
This opens up the UserGroup Form
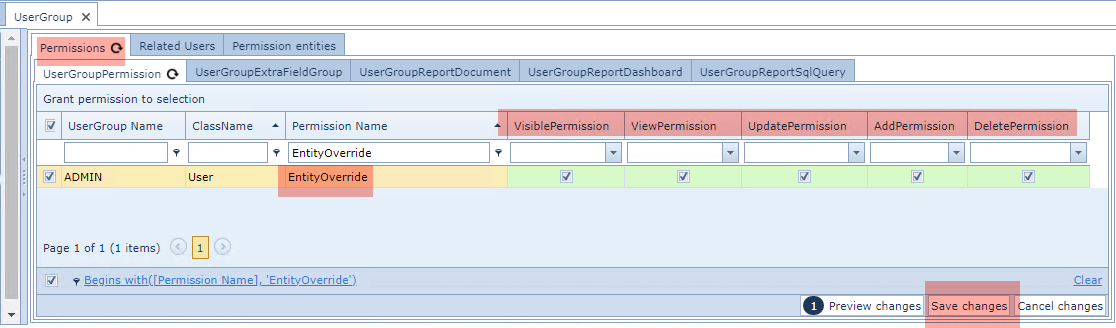
From the Permissions Tab and then in its nested Tab called UserGroupPermission ...
▪Type in Bulk in the EntityOverride column filter field and press the Enter/Return key - you should see the Permission Names listed as in the above screen shot
▪Ensure that the Permission Name called EntityOverride has the respective permission columns enabled
▪Click on the Save Changes option button in the lower right corner
Introduction
Some important points to be aware of regarding Datalayouts.
oEach IMS object - node, circuit, location, etc. - possesses a set of its own object properties, for example the Node object contains 66 properties (at version 22.x).
oNot all object properties are displayed or form part of each object's default IMS UI (layout).
oThe Customize Datalayout feature allows the user to override the default IMS UI by adding extra available object properties to that object's layout, hide certain existing properties, disable editing of certain visible properties, as well as setting its mandatory, order, and layout aspects.
oThe Add and Update layouts refer to the UIs presented when overrides are required when creating a new object instance (add) or editing an existing one (update).
oIf a property is added to an incompatible layout type, it will produce an error message i.e., there are no old names to an object, prior to its existence.

In this example the OldName field is designed to only appear once an object instance is created, therefore it is only possible to select this field for Update type layouts. The screenshot below shows how the UI on the left contains the OldName field (in an existing object instance) whereas the UI on the right does not (yet to be created).

Properties (fields) that are common to both create new and update layouts are referred to as DEFAULT
types.
Access Customize Datalayouts
From the IMS main Menu:
▪Select the System option followed by Admin and then Customize Datalayouts
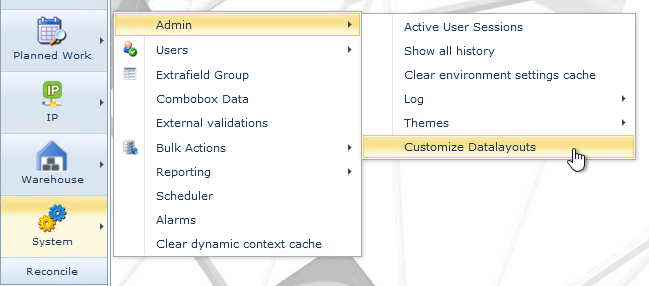
This open up the EntityOverrideForm

▪In the Search area, select the required object i.e., Circuit as shown above - the default view is displayed
▪If required, select a specific User Group that this property override will apply to - from the second search field
In the EntityOverrideForm Actions button bar, the following options are available:
Show All Overrides |
Displays a popup window with all available Override instances - modifications to these can be made in the popup window. |
In the Show All Overrides popup window it is useful to filter on the EntityName column that is being worked on i.e., Circuit. This will also provide an uncluttered view of all potential properties available to the applicable Entity being worked on, not just the default ones. |
Add Single Property |
Mechanism to add a new property to a required entity form layout. This opens up the Add Single Property popup window |
Add All Properties |
This will apply all the properties as defined Default by the IMS system. Remember that there are many more that could be selected - see the tip directly above about filtering on the entity name column |
Close Form |
This option closes the entire EntityOverrideForm module (Customize Datalayout) |
Adding Properties to a Form Grid
Properties can be added using the Add Single Property or Add All Properties.
Using the Add All Properties will add all the available properties to the UI display grid. These are all the default properties or fields for that object's form.
The Add Single Property is used to override the default form layout, by adding extra properties in the layout, for example: SITE.CITY.COUNTRY.NAME can be added to the Node's data layout to show location information.
GuiFieldSetup and Order layout properties
The GuiFieldSetup and Order properties work together to place existing and new fields in their respective object's display forms.
GuiFieldSetup
The following formats can be used to display new and existing properties in the object form tabs.
{Tabs} |
Required for the IMS Customize Datalayout system |
/tab name/ |
Default or user defined name for the tab - placed between 2 forward slashes |
<property group name>/ |
Should properties need to be grouped then create a suitable group name - placed between 2 angle brackets followed by a single forward slash |
<1|> |
Column indicator - a numerical value determines in which column of data the property will sit - used with or without property group names - more than 1 column can be used |
Add Single Property
When there is a requirement to add a new property to a form tab the Add Single Property is used.
From the EntityOverrideFormActions button bar:
▪Select the Add Single Property option
This open up the Add Single Property EntityOverride popup window.
▪Fill in the fields of information as required.
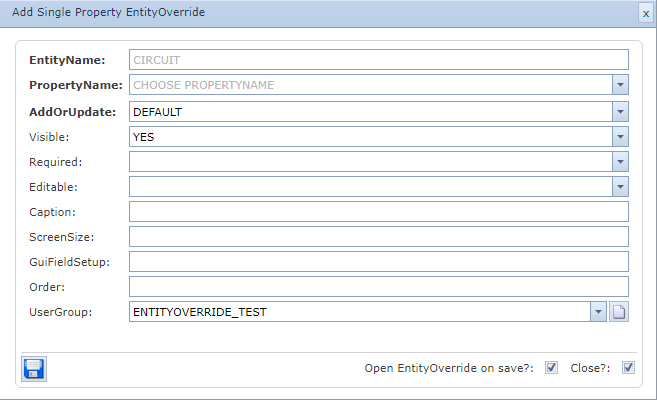
EntityName |
The IMS entity for the required form layout modification |
PropertyName |
The new property to add to the form layout |
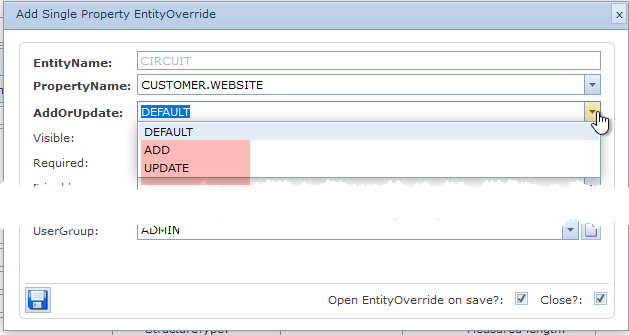
AddOrUpdate |
Select either the ADD (new) form layout or Update (edit) form layout |
Visible |
Show or hide the applicable property from the form layout [Yes / No] |
Required |
Option to make this property mandatory [Yes / No] |
Editable |
Option to allow modifications to this property [Yes / No] |
Caption |
Override the IMS default lable for this property with a user defined one |
ScreenSize |
[currently not functional] |
GuiFieldSetup |
Property layout position details in the form layout - details given further below |
Order |
Property's numerical value for positioning it in a given sequence relating to other properties |
UserGroup |
Option to apply an override to a particular User Group |
Add Single Property examples
Example 1:
The following describes how to add a new field (property) to an existing Circuit form data layout. The new field added will be the Customer's Name that is associated with a Circuit, and placed within the Routing Tab set of information.
Having opened the Customized Datalayouts object as described above:
1 |
In the Search field - select the required IMS object form, in this case the Circuit object form |
2 |
Select the required User Group name tab that will be associated with this change - The second search field in the Search section can be used to locate the required User Group |
3 |
From the EntityOverrideForm Actions button bar - select the Add Single Property option |
4 |
This opens up the Add Single Property EntityOverride popup window |
Various fields of information are to be filled in as required - in this example some of them are selected (Visible and Editable) and some left alone; Required (mandatory) and ScreenSize.

5 |
Locate and select the required database field - in this case CUSTOMER.NAME |
6 |
User defined alternative label to the system default one |
7 |
GuiFieldSetup - sets up the location of the field in the appropriate tab of information |
8 |
Order - Numerical value for the placement sequence of this field in the GUI in relation to other fields |
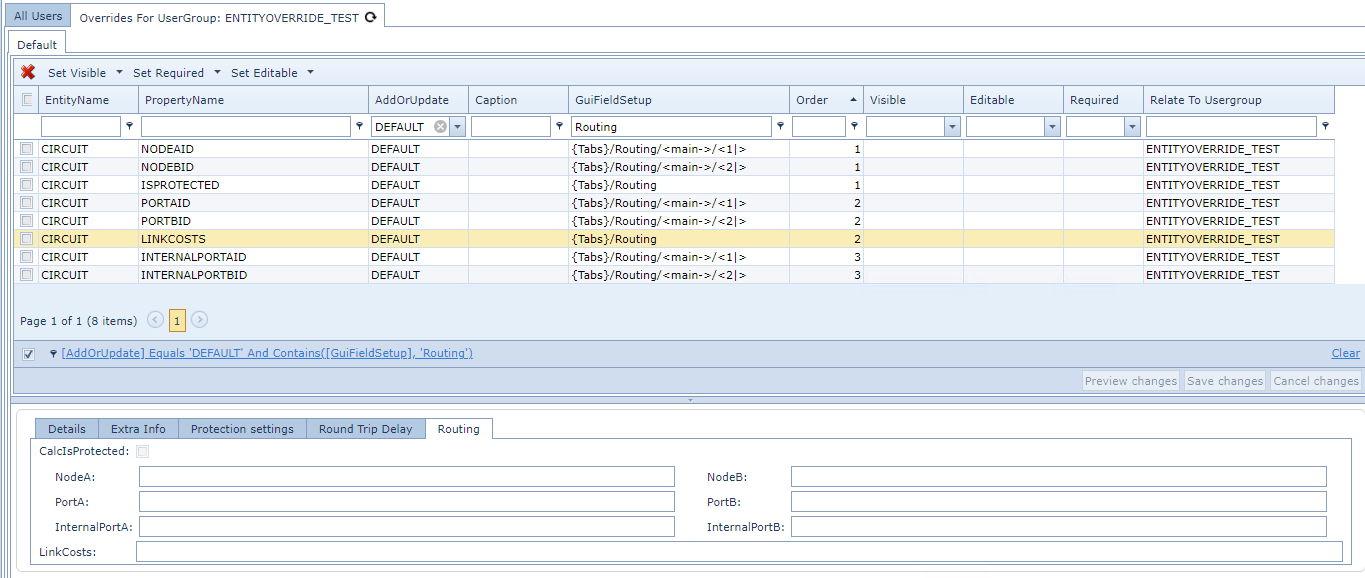
•In the above example, the Customer Name property is placed outside of the fields that are combined in a group called 'main'. This is because the GuiFieldSetup simply states that the new field is within the Routing tab and not grouped with other fields. •The Order field in the above screen shot, shows the number 3, which places the new property after the property called LinkCosts, which has an Order property value of 2. •Notice how the 'main' group of fields are slightly indented from the rest, starting from the field called NodeA: |
This screen shot is a before snap shot of the Routing tab
Example 2:
If the new property called Customer Name was required to be placed within the 'main' group, then a few extra bits of information are required in the GuiFieldSetup column.
▪Double click on the GuiFieldSetup column cell to modify it.
In this example the property group called 'main' is added followed by a numerical value of 2 indicating that it will be placed in the second column. Refer to the green highlighted portions in the screen shot below.
Should it be needed in the first column, say, under the existing property called InternalPortA, the the numerical value would be 1.
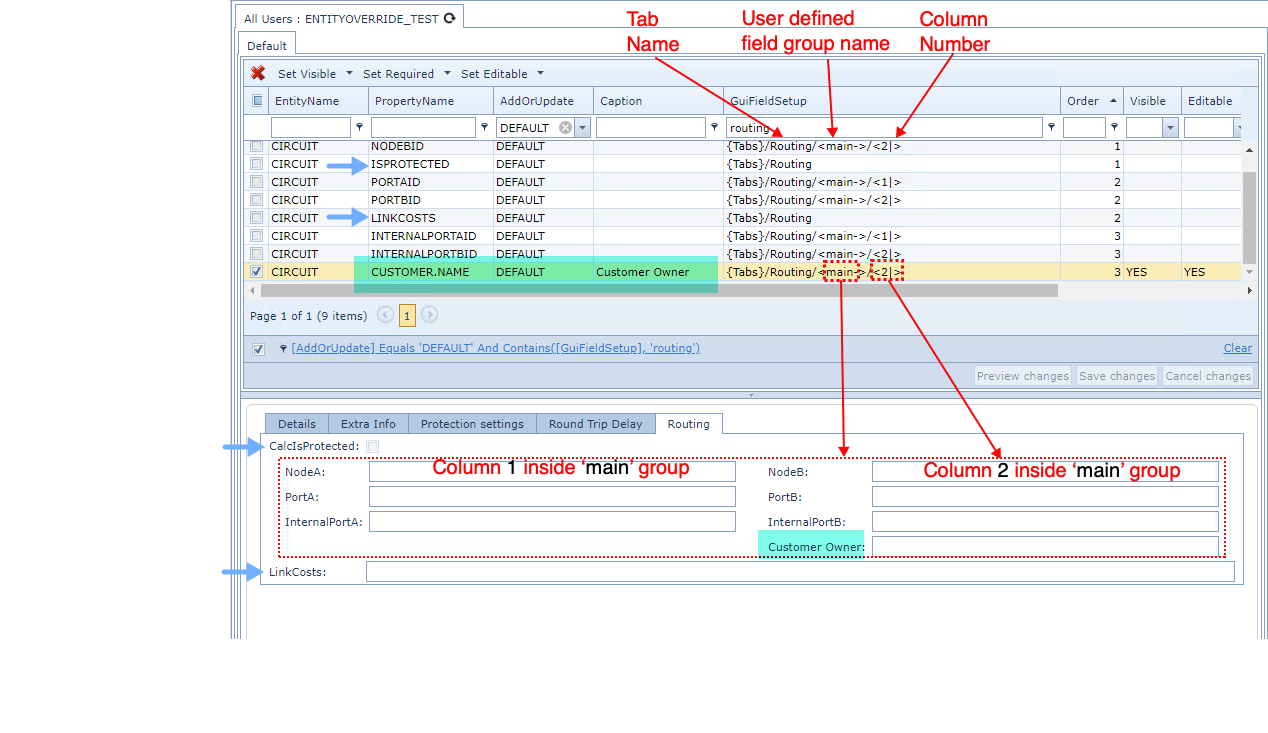
▪Click on the Save Changes button when finished - lower right corner of the Default tab
Text Field Height
For any given GUI field of type TEXT, its height can be adjusted in the Override Form, by locating the FieldHeight column and editing the height value (pixels) for the related Property Name (field).
From the IMS Main Menu:
▪Click on System : Admin : Customize Datalayouts
This open up the Entity Override Form
Follow the following steps:
|
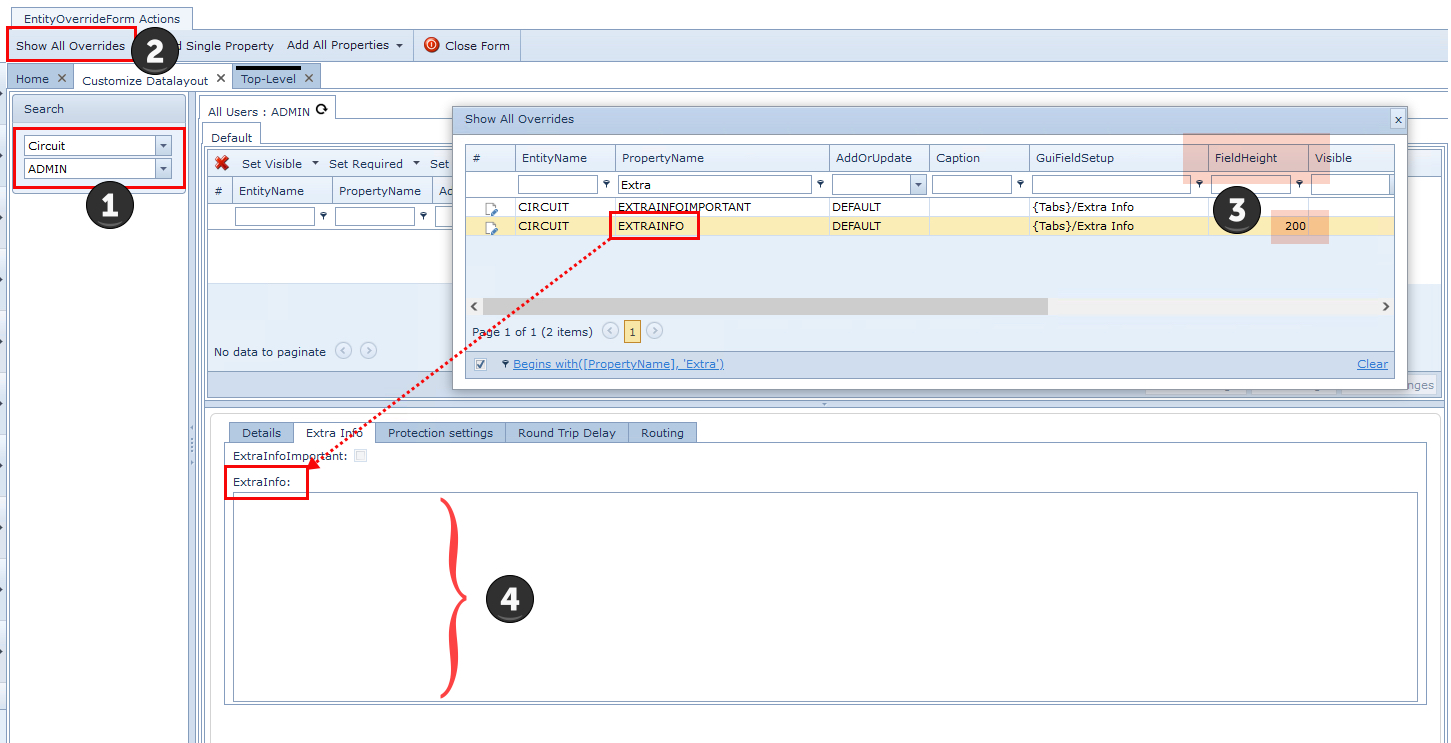
Select the required IMS Object and User Group in the Search area - in this example Circuit and ADMIN |
|
Click on the Show All Overrides tab in the EntityOverride Form |
|
▪Locate (filter optional) the required GUI field to adjust located in the PropertyName column - in this example the EXTRAINFO field ▪Click on the Edit icon (paper and pencil in the first column) in the data grid ▪Fill in the property field under the FieldHeight column with the required height value - in this example 200 pixels ▪Save the modification (first column in data grid - green tick) |
|
The result can be observed as an increased field height from its default option |