Filtering Grid Information
Each column of data has a free text search field and some also have an additional drop down list containing that field's meta-data.
The following screen shots show how to use both methods:
Filter by Free Text Field with Funnel Options
In this example the search is for Sites that contain the text "VM" in the Name field

▪Click on the Funnel icon at the end of the search field below the column titled Name
▪From the drop down list of options select one of the filter criteria - in this case "Contains"
▪Type in VM in the Name search field
▪In this example, 4 rows are returned in the result set
Drop Down Funnel Options - used along with user input text in the search field:
Begins with |
The default option - it will search for a match (case insensitive) beginning with the text the user inputs in the search field - left most only i.e., typing in VM in the Name field in the above example, without using any funnel options (or the 'Begins with' option), will produce no results as IMS is looking for anything that starts with VM - this is similar to Excel's 'Left' Function |
Contains |
Returns rows that contain what is in the search field, regardless of where the input text is in the data |
Doesn't contain |
Returns rows that do not contain the text in the search field |
Ends with |
Search for a match (case insensitive) ending with the text the user inputs in the search field - right most only - this is similar to Excel's 'Right' Function |
Equals |
Search for an exact match (case insensitive) |
Doesn't equal |
Search that excludes any rows that contain an exact match of what is in the search field |
Filter by Field Drop Down Method (Meta Data)
Some columns contain drop down arrows at the right most end of the field.
▪Simply click on the down arrow and select an option from the given list.
In this example, the Inventory Status column provides a filtering mechanism to locate Sites by their status.

Filter Builder
More complex filters can be created using the "Filter Builder" option.
Note: The intended use of the filter builder is to construct a more complex filter quickly and to be run on the fly. These filters are kept in memory for a limited time. The result of a filter built using this method is run, it will auto populate the relevant column header search fields accordingly. Once the populated column header search fields are cleared and the grid is reloaded, the 'built' filter is no longer available.
This Filter Builder feature can be accessed by:
▪Right clicking on a column header, and select the Filter Builder option.

The Filter Builder popup menu will open
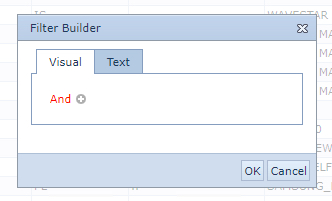
In the popup window's Visual tab, there are several building elements to note:
And |
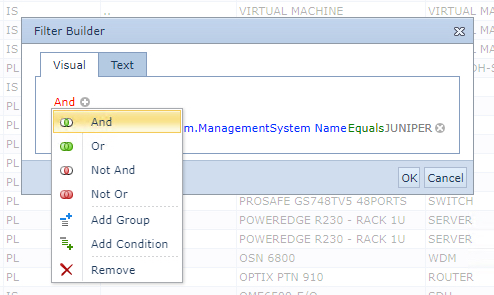
Used to construct more than one filter criteria - the default display is And, but there are more when clicked on - as shown below:
|
+ (symbol) |
Displays a list of available data fields associated with the related IMS object i.e., in this example the Equipment object - These are used to build the overall filter criteria - see the screenshot further below for an example of related table data |
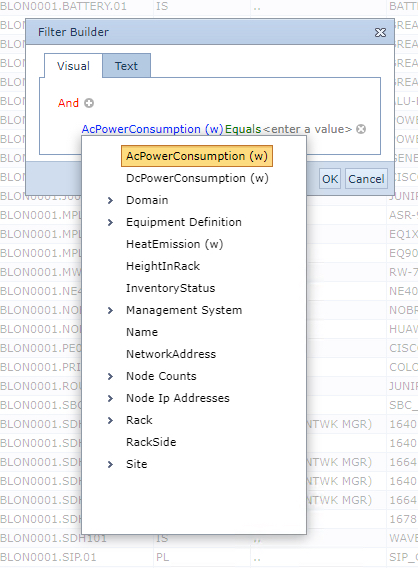
▪Click on the plus symbol to select the first field - IMS will auto populate the first field but this can be altered as required.
▪Click on the auto populated field [in blue text] to reveal all available fields for selection - as per the below screenshot
▪Select another item from the list to replace the default one, if required.
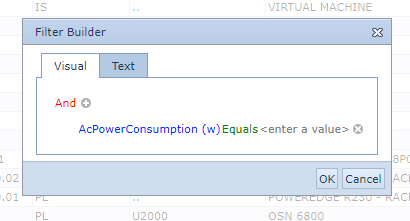
The next item [green text] is the math operands or comparison option
▪Select the item in the list according to your overall filter criteria

The next item is the Value part, which determines the field value required to be located or ignored.
▪Type in the value required for this field - in this case a vendor name is required
The following screenshot shows a typical result.

▪Click the OK button to run the filter
The Text tab, shows the text conversion of the Visually created filter, in this example a complex filter showing the management system of U2000 and the Site name as Amsterdam

For a more complex filter criteria, continue to use the above steps using operands, comparisons and fields to build it as required.
Sorting on multiple columns
As well as sorting on a single column, IMS allows for multiple column sorting. By right mouse clicking on required column headers and choosing the sorting option - ascending or descending - it is possible to carry out multiple sorting in the same grid of data, in this example we will select two columns from the Equipment tab under the Site object result set.

The first column header chosen is the Equipment Kind to be sorted in descending order.
▪Right click on the EquipmentKind column header and select the Sort Descending option

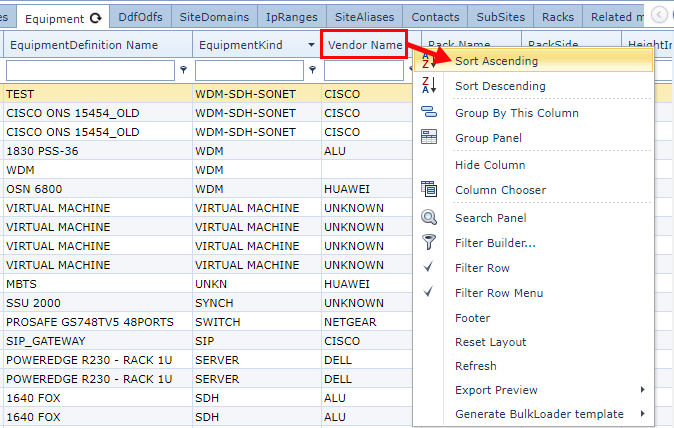
The second column header chosen is the Vendor Name to be sorted in an ascending manner.
▪Right click on the Vendor name column header and select the Sort Ascending option
The result in this example can now be seen in groups of equipment with their groups of different vendor names.

Grouping by Column
Another way to look at the data is by grouping it on a specified field. This option is called Group By This Column.

▪Right click on a field name header and chose the option Group By This Column
This will readjust the grid view to list equipment by the selected data field, in this example it is the Equipment Definition Name, as shown in the following screen shot, highlighted in green:

Each row of grouped data contains a counter revealing the quantity of records returned in the result set.
To reveal the row's details:
▪Click on the row's left most icon (chevron)
To reset the grid to its default view:
▪Right click on any column header and select option Reset Layout
Export Grid Data
The data visible in the grid can be exported in either Excel or CSV format.
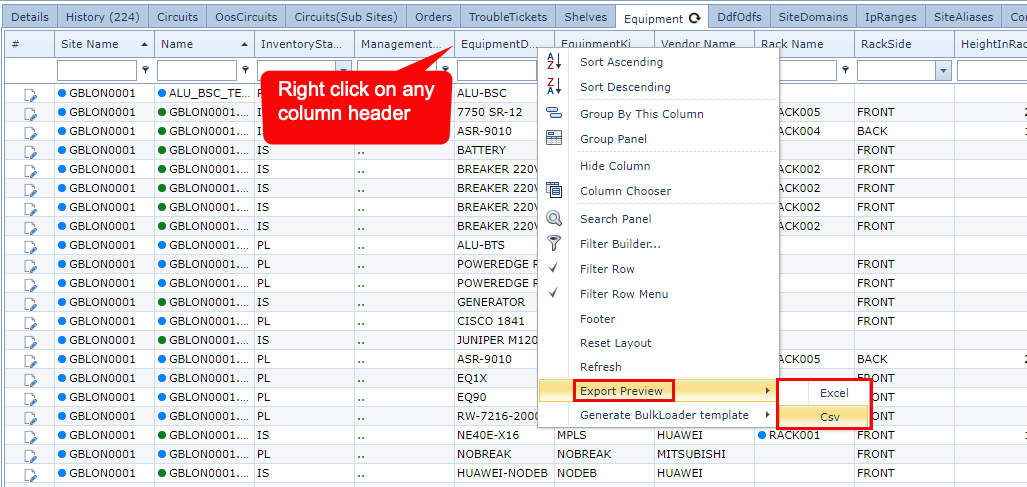
▪Right click on any column header and select option Export Preview
▪This provides the two export file formats for the data, select the required one.
When the export is complete, the file will be available either in the downloads folder or at the foot of the IMS window.
Generate a Bulkloader File
A useful feature is the IMS bulkloader which serves two main purposes:
▪Create a bulkloader file with existing data, enabling a user to perform mass changes on that existing data Or use the exported data file to obtain the required data structure format, in order to then replace the file with new data

To generate the bulkloader template:
▪Locate the required data grid
▪Perform any data filtering or grouping required, as shown earlier in this Information Grid chapter
▪Right click on any of the column headers
▪Select the Generate Bulkloader template option
▪Followed by either the Add or Update options
The following screenshot shows the main differences between the two output options of Add and Update
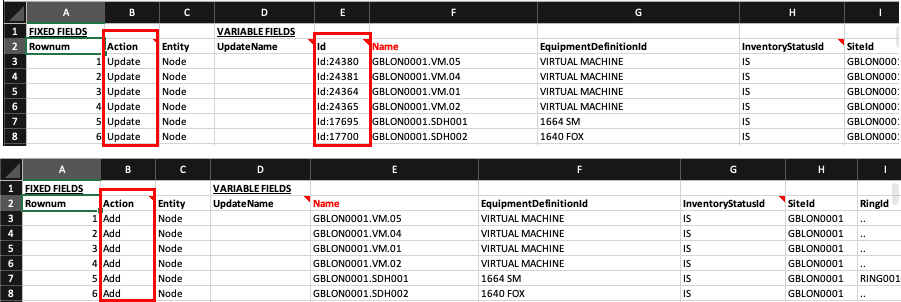
The Update version auto fills the Action column with the value of Update (for SQL) as well as including the column called Id, which is required to uniquely identify each record or row in the table that will be modified.
The Add version auto fills the Action column with the value of Add, and no Id data is required at this point, as IMS will create new Id fields when the data is added to the tables. It is at this point that the existing data is removed and replaced with new data as required.
Some examples of creating new data using the Bulkloader tool:
Create new Customers:
▪Go to the Customer form
▪Search for all the Customers
▪Filter the grid so that it only consists of the data required
▪Generate a bulkloader template
Create new Connections:
▪Go to any grid with a list of Connections - for example
oSite form - Connections Tab
oNode form - Physical Ports Tab
oSpeeds form - select a required Speed - Circuits Tab
▪Filter the grid so that it only consists of data that is required
▪Generate a bulkloader template
Then replace the existing data with new data and proceed to load it.
Tabs
Tab positions
It is possible to change tab positions on IMS objects by dragging them along the tab row. The new tab order will be stored as a user setting.
Moving Tab Positions:
Press the CTRL key and drag the required tab by holding down the left mouse button. In the example given the Speeds tab has been moved to the end of the tab row.

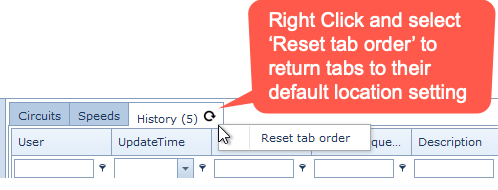
Resetting the Tab Order:
The Tab order can be reset to the default state by right clicking an active tab and selecting the Reset tab order option.
Memo Field Hyperlinks
URLs can be placed in memo-type fields.Once the field is saved, these then become active links to web their corresponding web pages when clicked (read mode). This section describes how to set up hyperlinks.
The following 2 screenshots are examples of how hyperlinks look like in the UI

Node object with a URL in the ExtraInfo field
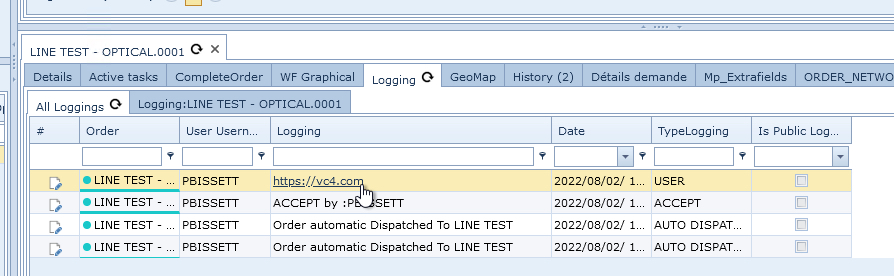
Order object with a URL in the Logging field
Creating a Hyperlink in a Memo field
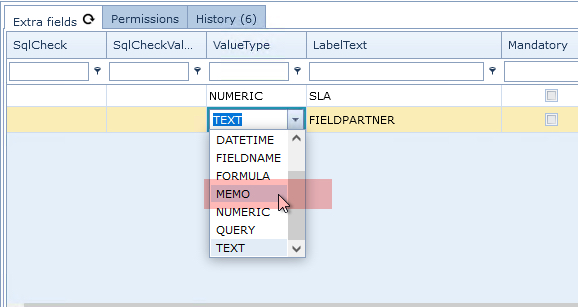
Extra Fields (existing and new) can easily be set to Memo type:
▪From a new or existing Extra Field instance, click on the drop down icon in the Value Type column to reveal available options
▪Select the MEMO option and Save
▪Proceed to the IMS object that contains this Extra Field, modify the field to include the URL hyperlink, and click Save.
This field will not contain the required Hyperlink.