Warehouse functional overview
The warehouse functionality in IMS has the following capabilities.
•Stock management
•Purchase Orders, material ordering process
•Material Templates
•Fast moving material management, e.g. cables, etc.
•Full relation of warehouse assets and network assets, should both processes be managed
from within IMS
The IMS warehouse functionality is designed with a certain flow in mind as displayed in the below flow
diagram, which is good to keep as reference for the remainder of this chapter

Warehouse functionality
Accessing the Warehouse forms
The warehouse forms are in IMS under the Warehouse button on left-hand button bar.

The menu bar above the warehouse forms contains the following buttons:

From left to right:
All Stock items |
displays all stock items irrespective of the stock selected |
Stockitems history |
menu bar to perform actions on stock items |
Stock Item Action |
a separate menu bar to perform actions on stock items |
Reserve Materials |
a form to reserve stock items (see chapter 3.5) |
Book in/out Cables |
a form for actions on cables (see chapter 3.13.1) |
New Material Ticket |
a Material Ticket is created when preparing stock items for pick-up |
Create Stock Rule |
via Stock Rules the minimum and maximum stock levels are defined |
Create New Purchase Order |
Creating New PO’s for ordering material (see chapter 3.2) |
Add material to stock |
to manually add material to the stock (see chapter 3.4) |
Create New Stock |
to create a new stock location (see chapter 4.2) |
Delete |
to delete a stock location |
Close Form |
to close the form |
Warehouse dashboard
On the Warehouse Stock form, it is possible to get an overview of the materials per stock.
IMS Warehouse menu button and click Stock in the list.
Use the top-left field to search and select the stock of which you want to have an overview of the materials
held within that stock.
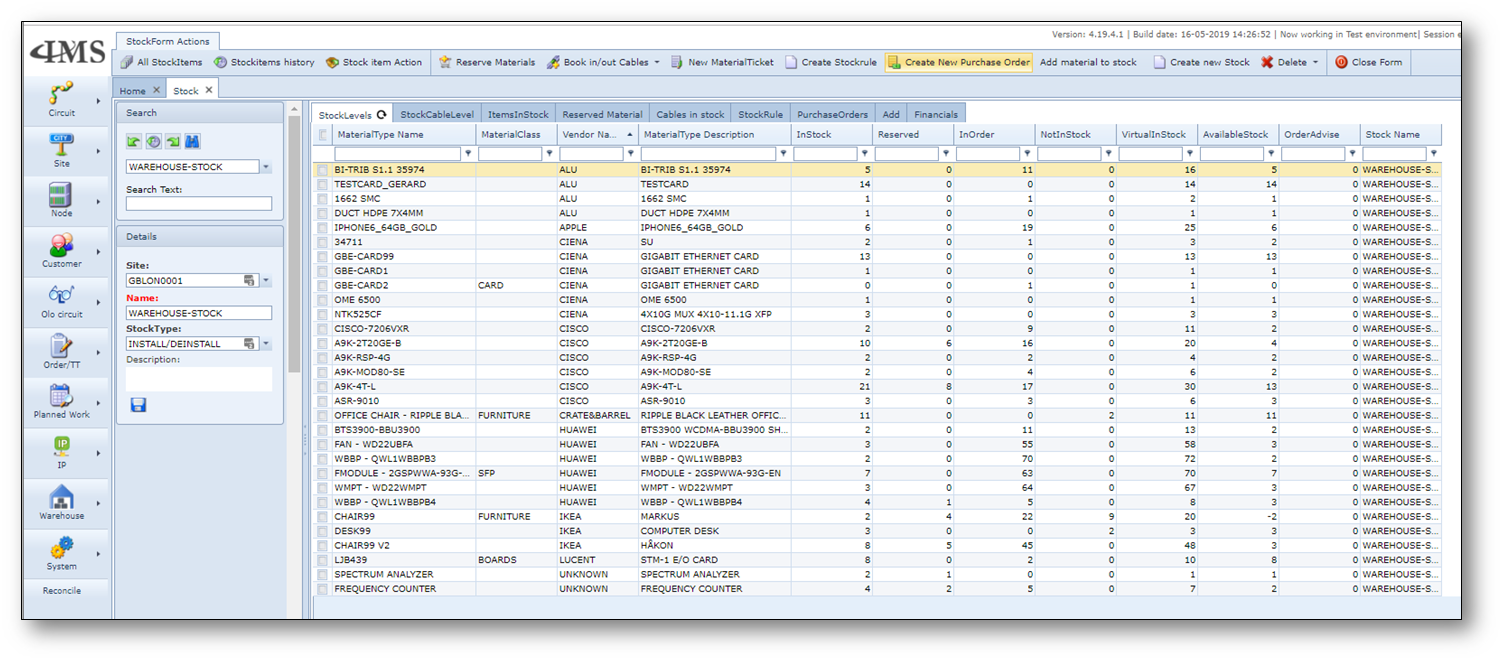
The following fields are shown on the StockLevels tab:
Field name |
Explanation |
MaterialType Name |
Name of the material type |
MaterialClass |
Related class of the material type |
Vendor Name |
Vendor or manufacturer of the material |
MaterialType Description |
Description of the material |
InStock |
Amount of the material in stock |
Reserved |
Amount of reservations for the material |
InOrder |
Amount in order for the material |
NotInStock |
Negative stock for the material |
VirtualInStock |
Result of amount Instock minus Reserved plus InOrder |
AvailableStock |
Current available stock, e.g. Instock minus Reserved |
OrderAdvise |
Amount to be ordered for this material based on the configured rules (minimum and maximum stock values). Should the amount of VirtualInStock become less than the configured maximum stock, then the OrderAdvise will be the amount of maximum stock minus the amount of VirtualInStock |
Ordering new material
1.There are two ways of adding material items to a stock. The first and advised way is by following
the ordering process by creating a new Purchase Order, as indicated in step 1 of the diagram of
chapter 2.
2.The second method is by directly adding material items to the stock, thus skipping the ordering and
delivery process steps, as indicated in step 2 of the diagram of chapter 2 (see also chapter 3.4)
The menu bar above the PO forms contain the following buttons:

From left to right:
All Purchase Orders |
overview of all existing PO’s |
Commit Order List |
to commit the order list of a PO after verification |
Add Logging |
to add a log text for the PO |
Add Material to PO |
to add material to the order list of a PO |
Add Invoice |
to add Invoice information to the PO |
Create New Purchase Order |
create a new PO |
Delete |
to delete a PO |
Close Form |
to close the form |
Purchase Order
Ad 1. A purchase order must be created to order new material. It allows for tracking the ordering and
delivery process and can be used to control the budget.
Step 1: Create a new PO
Warehouse menu button and click Purchase Orders in the list.
On the Purchase Order form click the button “New PO” to create a new purchase order for ordering new material
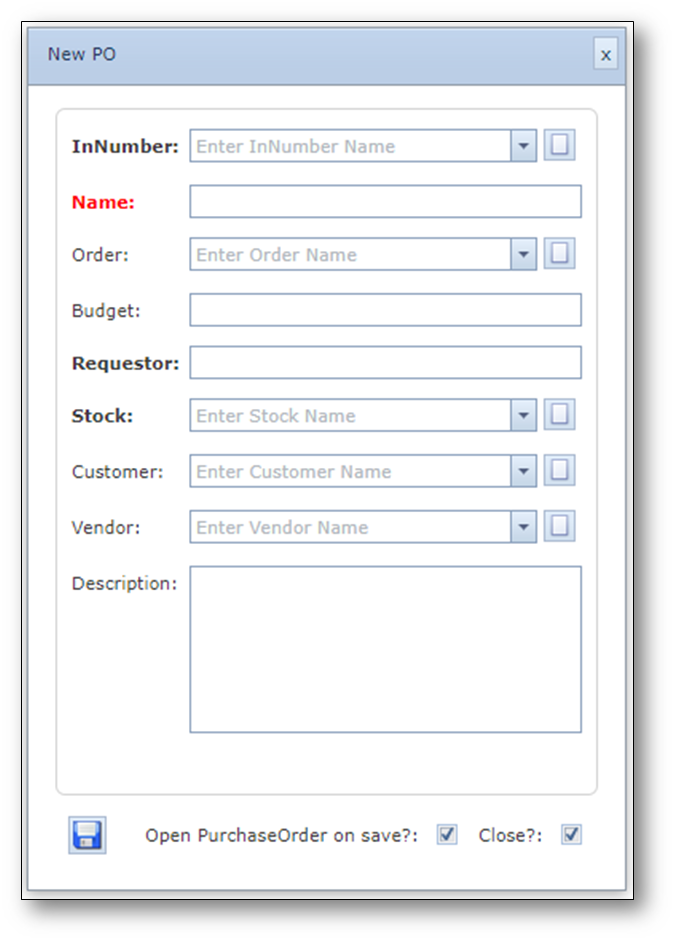
The New PO form contains the following fields:
Field name |
Explanation |
Requirements |
InNumber |
Select the IN (investement number) from the list or create a new one (explained below in chapter 3.2.2) |
Mandatory |
Name |
Name or number of the PO |
Mandatory and unique |
Order |
Related order number |
Optional, but advised |
Budget |
Budget amount for the PO |
Required if prices are used for proper calculation |
Requestor |
Name of the requestor |
Mandatory |
Stock |
Related stock |
Mandatory |
Customer |
Related customer if the PO is for 1 specific customer |
Optional |
Vendor |
Related vendor if the PO is related to 1 vendor |
Optional |
Description |
Additional details |
Optional |
Open PurchaseOrder on Save |
Checkbox to control automatic opening of the new PO on save |
|
Close? |
Checkbox to control the closing of the form on save |
|
Save button |
Button to create the new PO and save it in the IMS warehouse database |
|
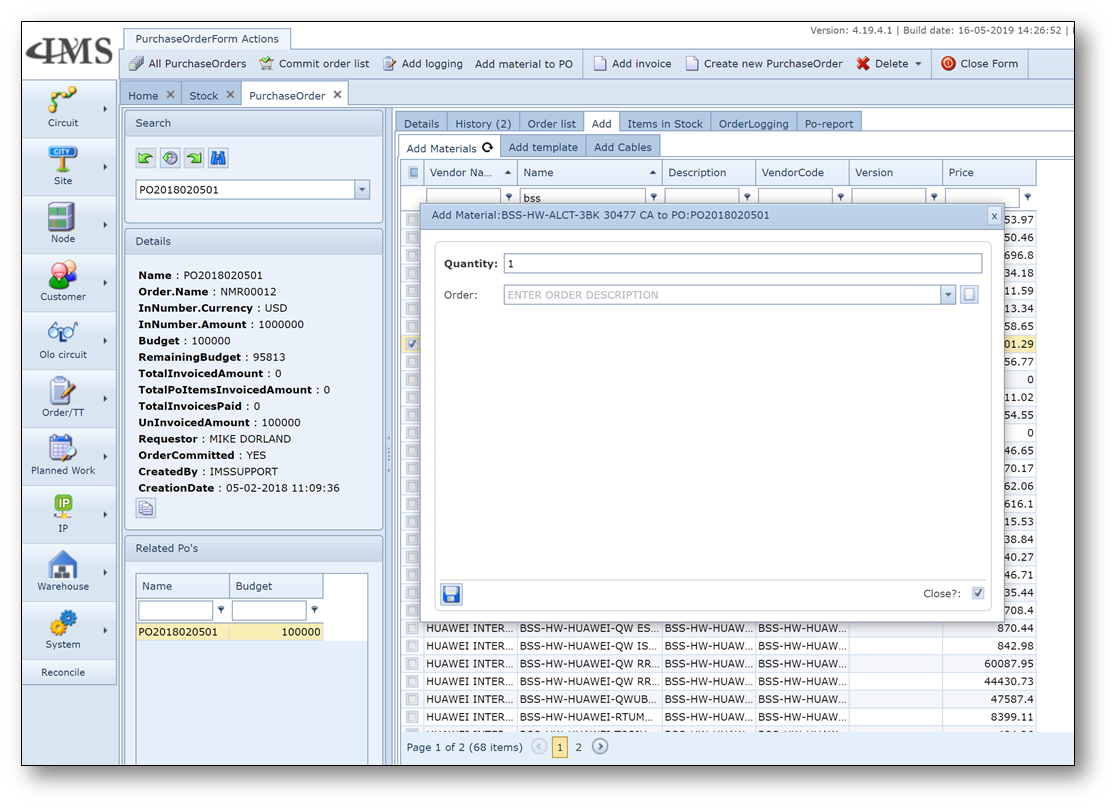
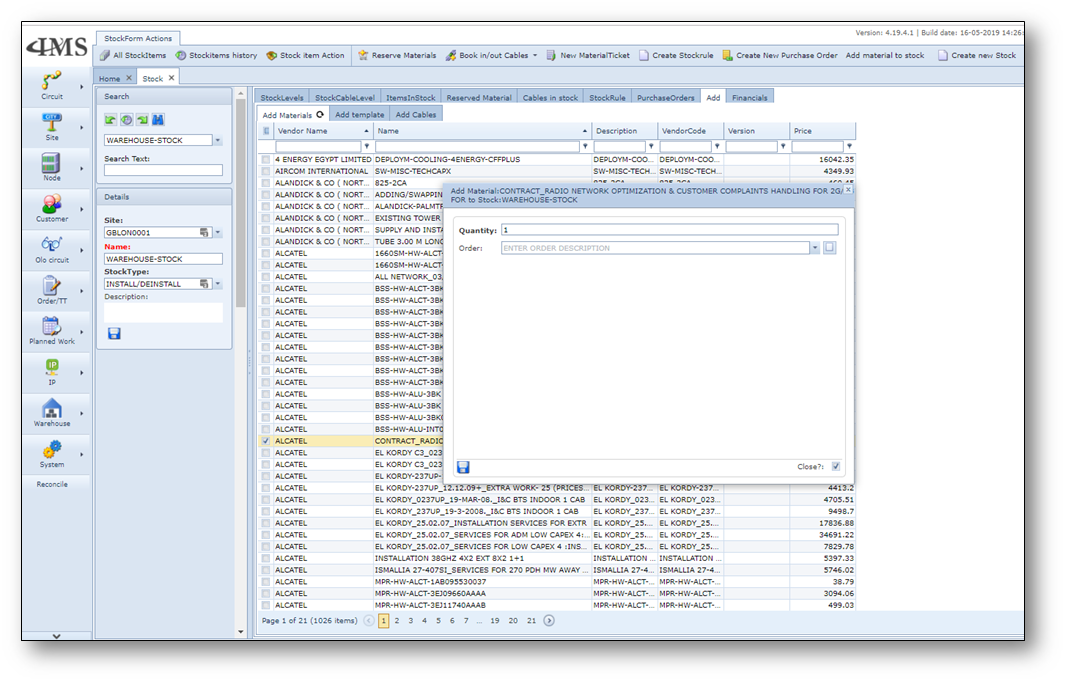
Step 2: Add material for ordering to the new PO
1.With the new PO created navigate to the Add tab on the Purchase Order form. The Add tab list all
the available material types for ordering.
2.Select one or more material types from the list and click the “Add material to PO” button.
3.On the pop-up window fill in the quantity of the material you want to order and click the save button
to add the material(s) to the PO.
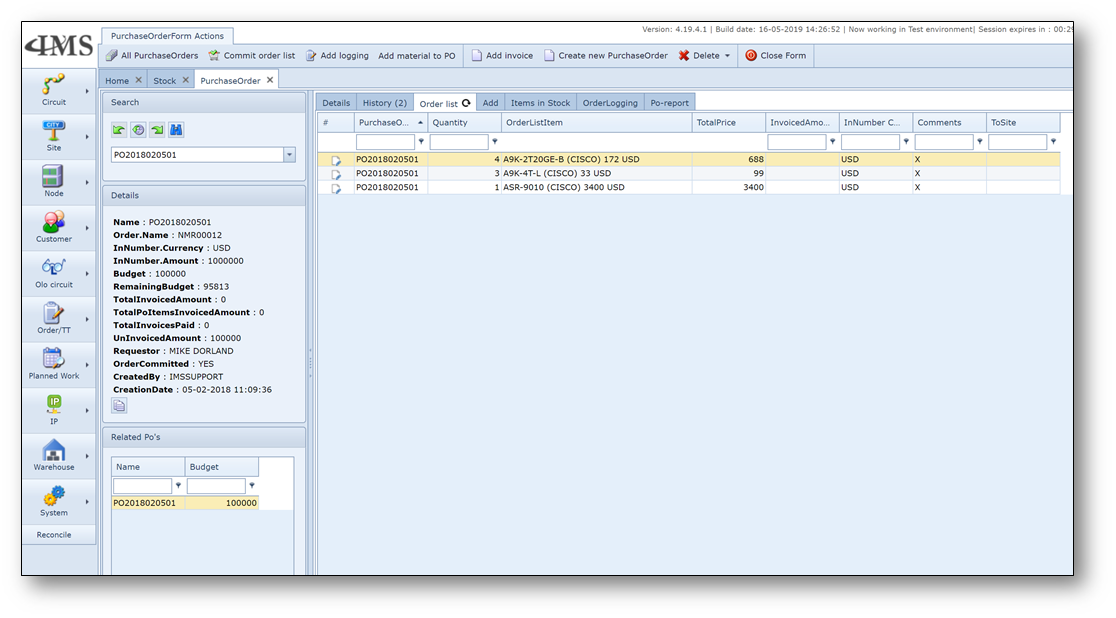
Step 3: Review and commit order list
Once all the materials have been added to the PO you can navigate to the Order list tab to review the list of
materials. You can adjust the amount of materials or remove materials from the list.
Click the “Commit order list” button when the order list is complete.
This will create the material items in the database which allows them to be reserved even before they have
been delivered.
IN Number
An investment number (IN) must be created to allow for budget allocation to a PO for ordering material.
An IN is usually created for a whole project or order to control the complete budget and PO’s related.
Multiple PO’s can be related to one IN.
Warehouse menu button and click IN Number in the list.
The menu bar for IN Number registration contains the following buttons:
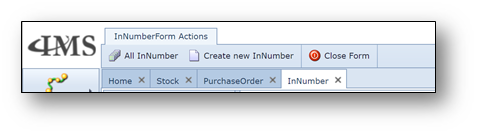
From left to right:
All InNumber |
overview of all existing IN numbers |
Create New InNumber |
create a new IN |
Close Form |
close the form |
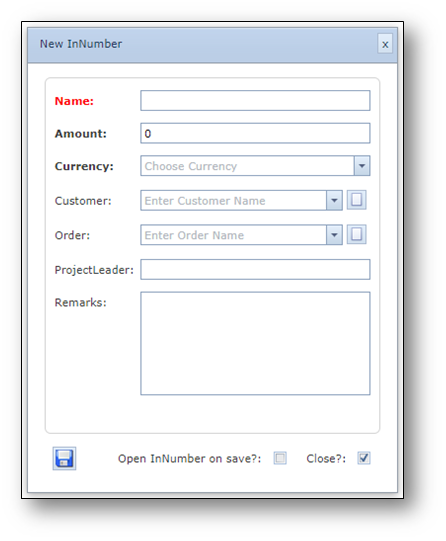
The New InNumber form contains the following fields:
Field name |
Explanation |
Requirements |
Name |
Name or number of the IN |
Mandatory and unique |
Amount |
Budget amount for the IN |
Mandatory, but can be 0 is material prices are not used |
Currency |
Select the appropriate currency used |
Mandatory |
Customer |
Related customer if the IN is for 1 specific customer |
Optional |
Order |
Related order if the IN is for 1 specific order |
Optional |
ProjectLeader |
Name of the project leader |
Optional |
Remarks |
Additional details |
Optional |
Open InNumber on Save |
Checkbox to control automatic opening of the new IN on save |
|
Close? |
Checkbox to control the closing of the form on save |
|
Save button |
Button to create the new IN and save it in the IMS warehouse database |
|
Delivery of new material
As indicated in step 2 of the diagram in chapter 2, material items will be delivered after they have been ordered.
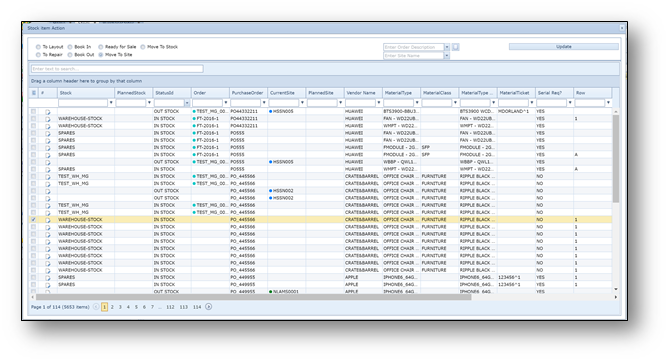
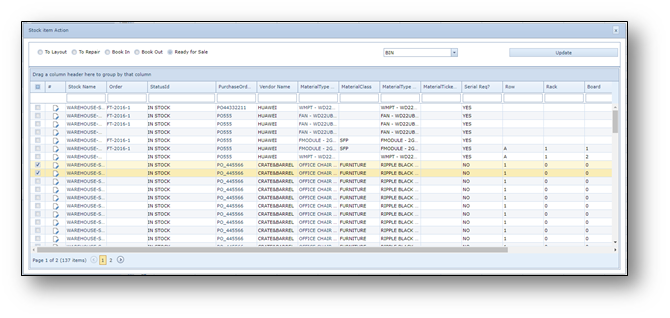
This can be done on the Stock form by clicking the “Stock item Action” button.
This opens the stock item action window which allows you to perform actions on the various material items
related to the current stock. For delivery of material items, the “Book In” option is used.
1.On the stock item action window select the option “Book In” to list the material items
which can be booked
into the current stock. The list contains material items with the status ordered, out stock, not in stock,
defect and returned to supplier.
2.Use the filter row function on the grid to search for the material items which have been delivered,
for example the purchase order or material name.
3.Material items for which the serial number is required will have to be updated with the actual serial
number first, this can be done by using the following steps.
-Locate the material item in the list and double-click in the SerialNumber field and fill in the
serial number of the material item and press the “V” at the left most side of the row to accept
the change.
4.Select the material items that have been delivered and click the update button to update
the status of these material items to “in stock”.

Add material to stock
Ad 2. As mentioned in chapter 3.2, the second method is by directly adding material items to the stock,
thus skipping the ordering and delivery process steps, as indicated in step 2 of the diagram of
chapter 2.
1. |
This can be done on the Stock form by navigating to the Add tab, this list all the available material types that are deliverable |
2. |
Select one or more material types from the list and click the “Add material to stock” button |
3. |
Fill in the required quantity and the order number and click the save button to add the material item(s) irectly to the stock with the status “In Stock” |
Reserve material
The next step in the process flow of the material items is to reserve materials as shown in the diagram of
chapter 2 at step 3. Material reservations can be made regardless of whether they are in stock,
in order or not in stock at all.
The following priority is used in selecting material items for reservation.
1.In stock
2.In order
3.Out stock (negative stock)
Reservations are made based on the material type name and not so much the actual material item in the
database. This is useful when for example reservations are made on high volume material items, like SFP’s,
that contain a serial number. The serial number is assigned at a later step in the process.
On the stock form click the button “Reserve Materials” to create a new material reservation.
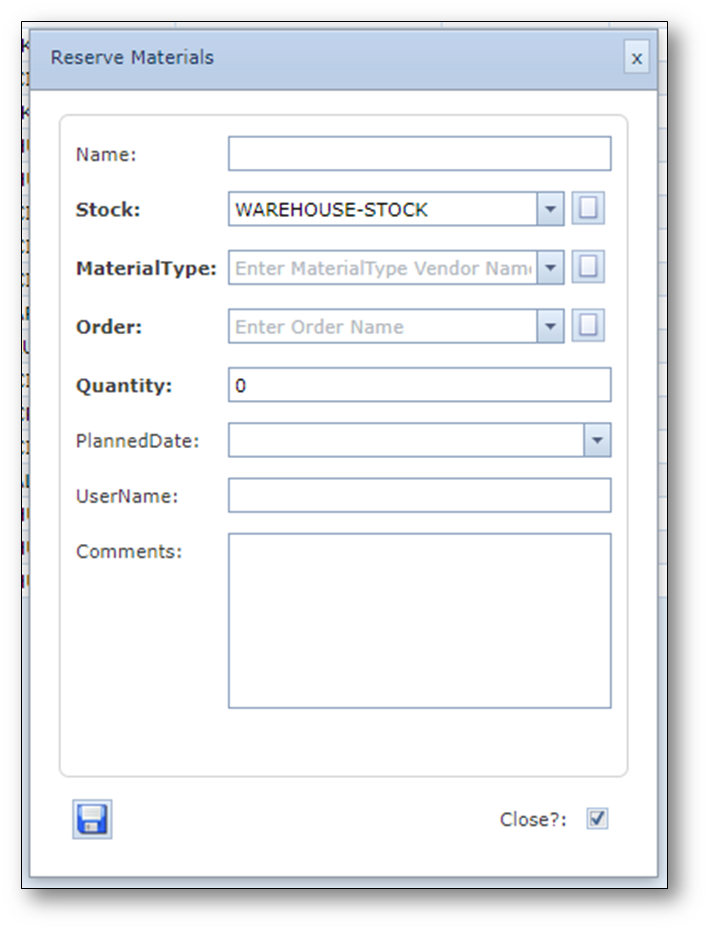
The reserve material form contains the following fields:
Field name |
Explanation |
Requirements |
Name |
Name of the material reservation for later reference |
Optional |
Stock |
The stock containing the materials |
Mandatory |
Material Type |
Name of the material type |
Mandatory |
Order |
Order number |
Mandatory |
Quantity |
The amount of material items |
Mandatory |
Planned Date |
|
Optional |
Username |
|
Optional |
Comments |
|
Optional |
Close? |
Checkbox to control the closing of the form on save |
|
Save button |
Button to create the new material reservation and save it in the IMS warehouse database |
|
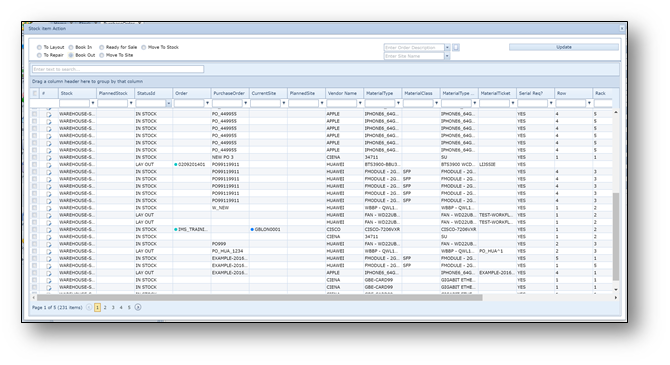
Material to layout
This step in the process is to set (reserved) material items to layout, which means that they are ready to
be picked up for installation. This is shown in the diagram of chapter 2 at step 4.
For high volume material items containing serial numbers, like SFP’s, it is advised to skip the layout step
and to directly book out these material items as explained in the next chapter.
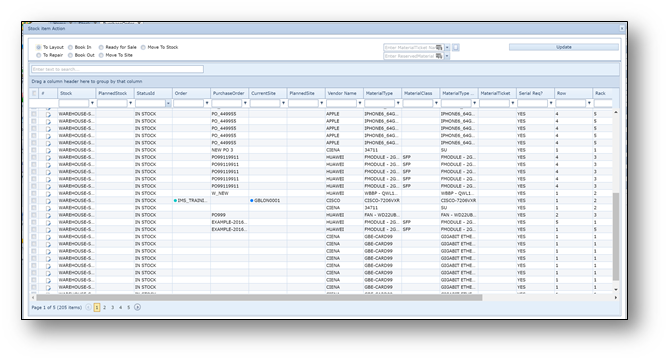
4.On the stock form click the button “Stock item action” to open the stock item action window and
select the “To layout” option. This lists only material items ‘in stock’.
5.Two additional fields appear:
a.Material ticket name
b.Reserved material
6.These fields allow the list of material items to be limited to a certain material reservation and/or
a specific reserved material type.
7.Select the required material items from the list and click the update button to update the status
of the material item(s) to layout.
Book out material
When material items have been taken from the stock, either through the reservation/layout steps or
directly from stock, the status must be updated to “out stock” by booking out the material item(s).
This is shown in step 5 of the diagram in chapter 2.
1.On the stock form click the button “Stock item action” to open the stock item action window and
select the “book out” option. This will list all material items with the status “in stock” and “lay out”.
2.Select the material item(s) from the list and select the “update” button to change the status to
“out stock”.
Defect material
Material items returned to stock can be set on status “Defect” if they are defect or malfunctioning.
This allows the material items to be send to a vendor for repair or can be removed from stock should this
be desired. (if the IMS inventory is also related, cards can be set to defect already in the inventory node screen)
1.Changing the status of a material item to “Defect” can be done on the stock form by navigating to the
ItemsInStock tab. This tab lists all the individual material items related to the current selected stock.
2.Locate the material item in the list and double-click the StatusId field and change the status to
“Defect” and press the “V” at the left most side of the row to accept the change.

Repair material
Material items with the status “Defect” can be sent to a vendor for repair. This updates the status of the
material item(s) to “returned to supplier”.
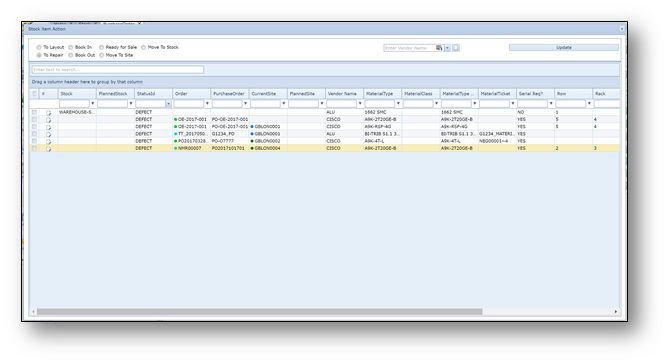
1.On the stock form click the button “Stock item action” to open the stock item action window and
select the “To Repair” option to list all the material items with the status “Defect”.
2.Select the material item(s) in the list and the vendor on the additional field that has appeared when
selecting the “To Repair” option at the top of the window and press the “update” button to change
the status of the material item(s) to “returned to supplier”.
When the material items have been repaired and received back from the supplier then the material items
can be booked back in stock by following the steps explained in chapter 3.3.
Move to stock
Material items with the status “In Stock” or “Out Stock” can be moved to another stock or from the inventory
back to the stock. This updates the status of the material item(s) to “in transfer” in case the stock is moved
from one stock to another and to “to be returned” if the item is moved from the inventory (out stock) back to
a stock.
1.On the stock form click the button “Stock item action” to open the stock item action window and
select the “Move to Stock” option to list all the material items with the status “In Stock” or “Out Stock”.
2.Select the material item(s) in the list and the stock and order in the additional fields that appeared
when selecting the “Move to Stock” option at the top of the window and press the “update” button
to change the status of the material item(s) to “in transfer” or “to be returned”.
The items in status “to be returned” and “in transfer” can be booked into the stock by following the steps
explained in chapter 3.3

Move to site
Material items with the status “In Stock” or “Out Stock” can be moved to a site. This updates the status
of the material item(s) to “in transfer”.
1.On the stock form click the button “Stock item action” to open the stock item action window
and select the “Move to Site” option to list all the material items with the status “In Stock” or “Out Stock”.
2.Select the material item(s) in the list and the site and order in the additional fields that appeared
when selecting the “Move to Site” option at the top of the window and press the “update” button
to change the status of the material item(s) to “in transfer”.
The items in status “in transfer” can be booked out the stock by following the steps explained in chapter 3.7.
Material ready for sale
Material items can leave the stock by assigning to a bin, for example to sell them to a third party or to dispose
of them. This can be done by registering the appropriate bin and assigning the material items to the bin.
Step 1: Create a new material bin
Warehouse menu button and select Material Bin from the list. This opens the MaterialBin form.
Click the “New” button to create a new material bin.
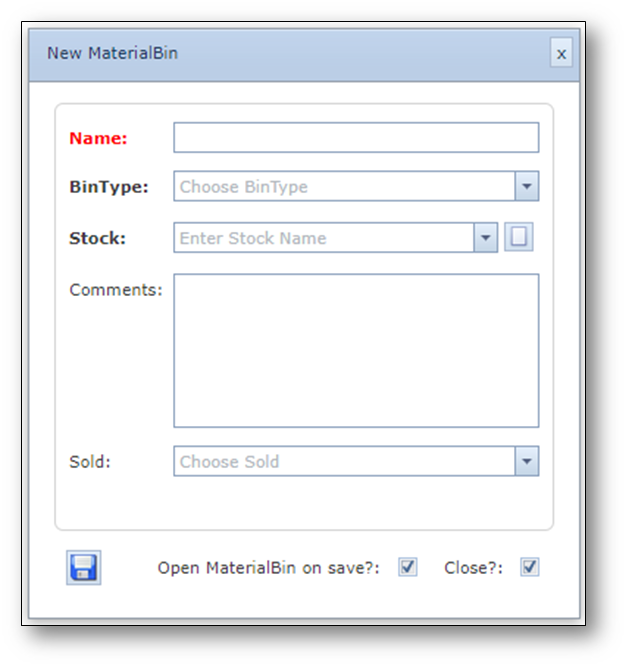
The new MaterialBin form contains the following fields:
Field name |
Explanation |
Requirements |
Name |
Name of the material bin |
Mandatory and unique |
Bin Type |
Type of the bin, for example sale or waste |
Mandatory |
Stock |
Stock the bin is related to |
Mandatory |
Comments |
|
|
Sold |
Yes or No, indicating if the bin is sold and the associated material items have left the stock |
|
Open MaterialBin on Save |
Checkbox to control automatic opening of the new material type on save |
|
Close? |
Checkbox to control the closing of the form on save |
|
Save button |
Button to create the new material bin and save it in the IMS warehouse database |
|
Step 2: Assign material items to a bin
On the stock form click the button “Stock item action” to open the stock item action window and
select the “Ready for Sale” option. This will list material items with the status in stock.
Select the material item(s) from the list and select the appropriate bin in the additional field that appeared
when selecting the option “Ready for Sale” and select the “update” button.
Cables
The management of cables is different in the IMS warehouse module, due to the nature of cables and the
way of ordering/delivering cables.
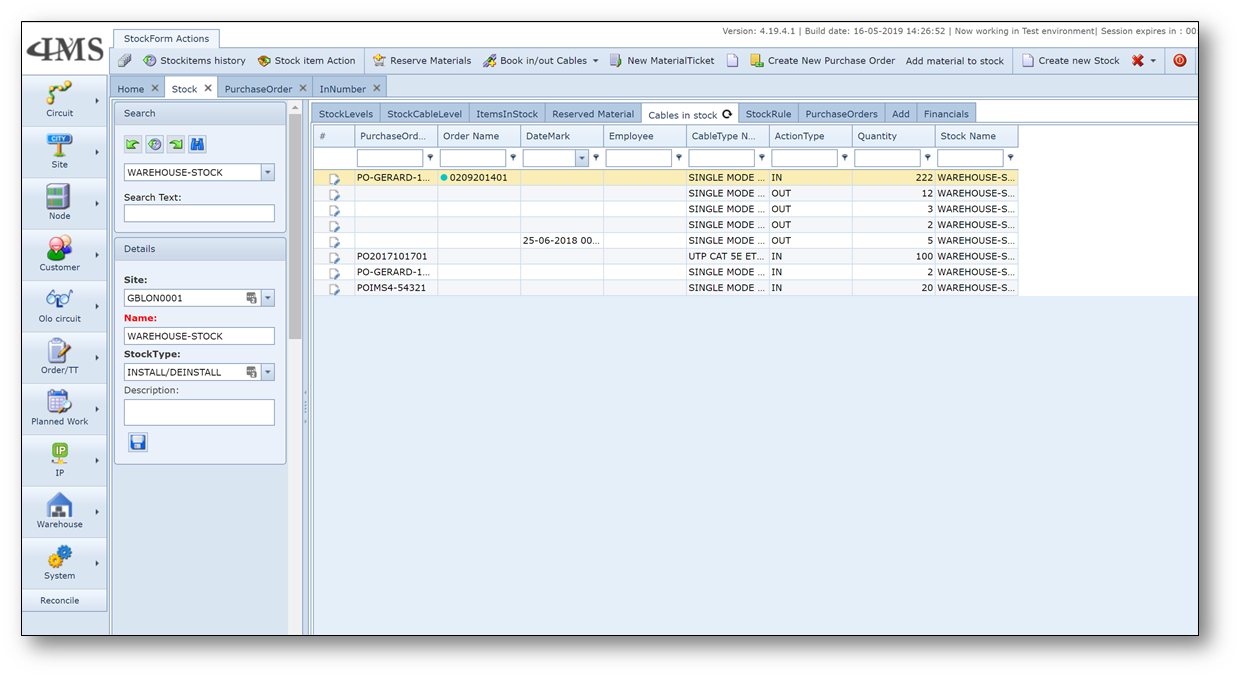
Cables are not included in the stock level form, but in a separate tab: ‘Cables in Stock’
To book in or book out cables use the button on the warehouse menu bar ‘Book in/out Cables’ and select ‘IN’ or ‘OUT’
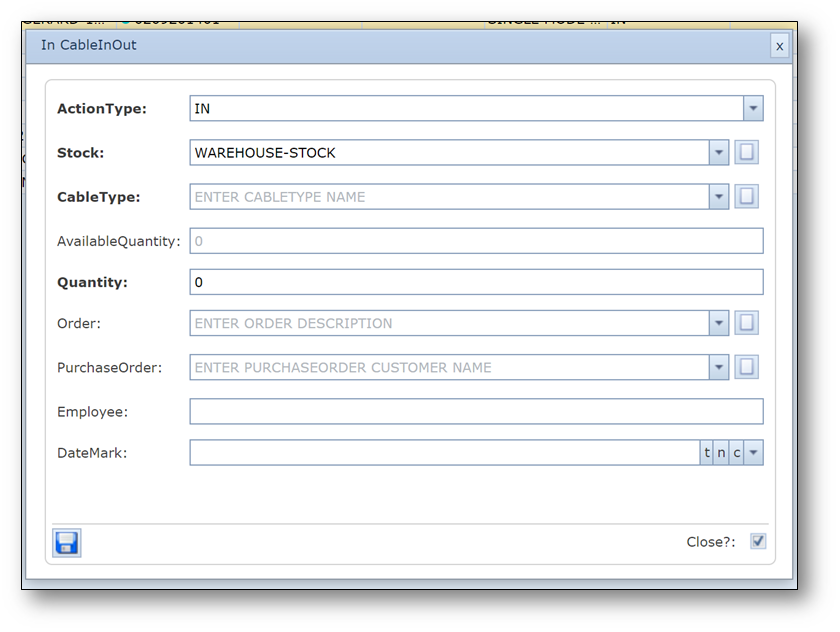
The action type field and the stock field are already filled-in, but these can be modified if necessary.
Fill in:
Cable type - the type of cable, defining if ordered by qty or length
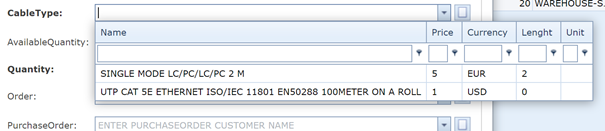
The available quantity in stock is displayed for your convenience
Fill in:
Quantity |
number of pieces or meters/rolls (mandatory) |
Order |
the order number (optional) |
Purchase Order |
the PO number (optional) |
Employee |
employee name (optional) |
DateMark |
timestamp (optional) |
Warehouse administration
Register Material Types
Warehouse holds a separate library of equipment types and as such material types must be defined.
Material types can be setup independent of the inventory types depending on how the warehouse
functionality is intended to be used.
Access the Warehouse Material Types form
Warehouse menu button and click Material Type in the list.
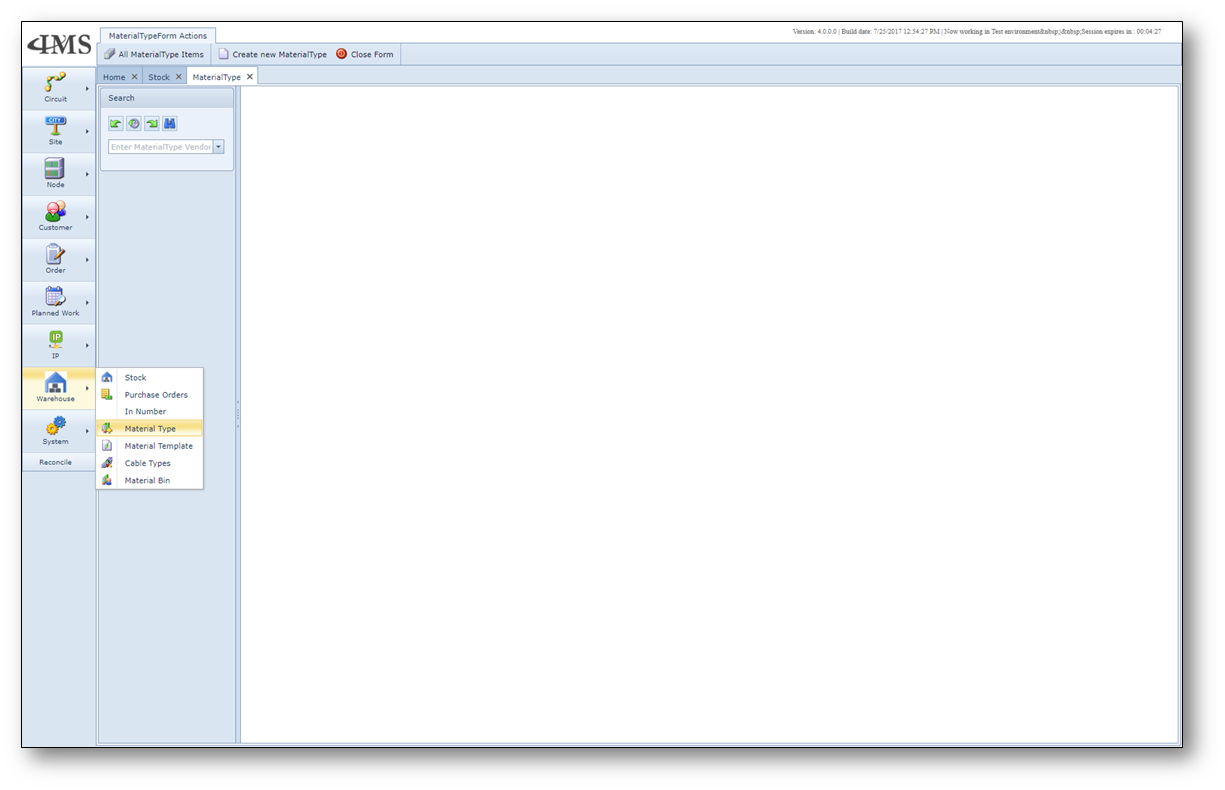
Create new material type
On the Material Type form click the button “Create new MaterialType” to open the form to create a new material type.
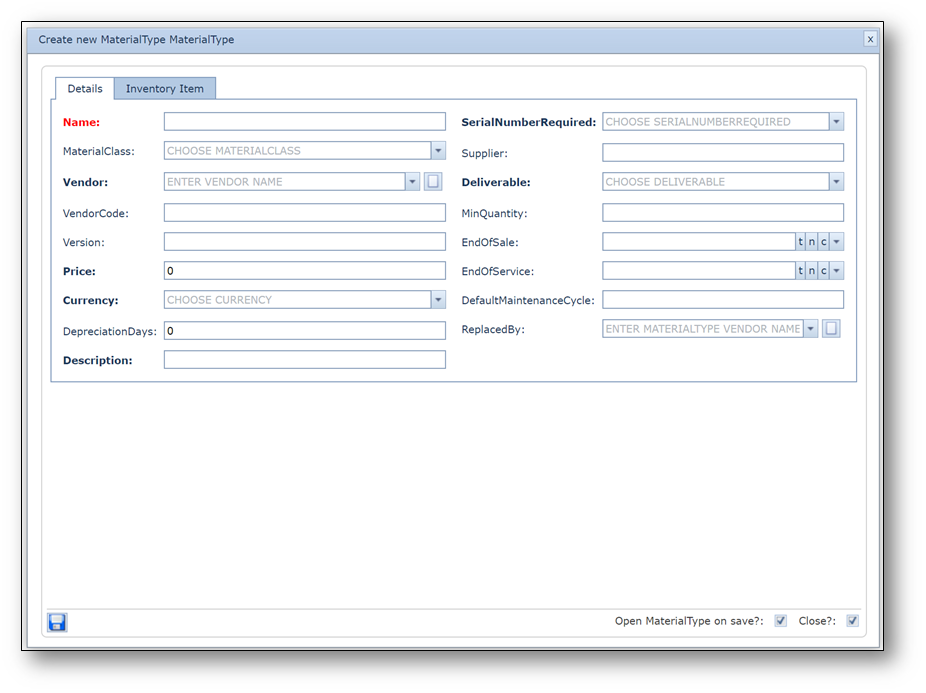
The Details tab of the form contains the following fields:
Field name |
Explanation |
Requirements |
Name |
Name of the material type |
Mandatory and unique |
MaterialClass |
Can be used the categorise materials into classes |
Optional |
Vendor |
Vendor or manufacturer of the material |
Mandatory |
VendorCode |
Code of the vendor |
Optional |
Version |
Version of the material |
Optional |
Price |
Material price to purchase |
Mandatory, but can be 0 should finances be managed outside of IMS |
Currency |
Related currency of the material price |
Mandatory |
DepreciationDays |
Period of depreciation in number of days |
Optional |
Description |
Additional details of the material type |
Mandatory |
SerialNumberRequired |
Define if the material type has a serial number which should be registered upon delivery. Not advisable for fast moving and/or high-volume materials |
Mandatory |
Supplier |
Supplier of the material |
Optional |
Deliverable |
Field to indicate if the material is deliverable yes/no |
Mandatory |
MinQuantity |
Mininum quantity in stock |
Optional |
EndOfSale |
End of sale date |
Optional |
EndOfService |
End of service date |
Optional |
DefaultMaintenanceCycle |
Period after which maintenance should be performed in days |
Optional |
ReplacedBy |
Field to indicate a replacement should material not be deliverable anymore |
Optional |
Open MaterialType on Save |
Checkbox to control automatic opening of the new material type on save |
|
Close? |
Checkbox to control the closing of the form on save |
|
Save button |
Button to create the new material type and save it in the IMS warehouse database |
|
Should the material be related to an object in the IMS inventory, then the tab Inventory Item can be used,
which contains the following fields:
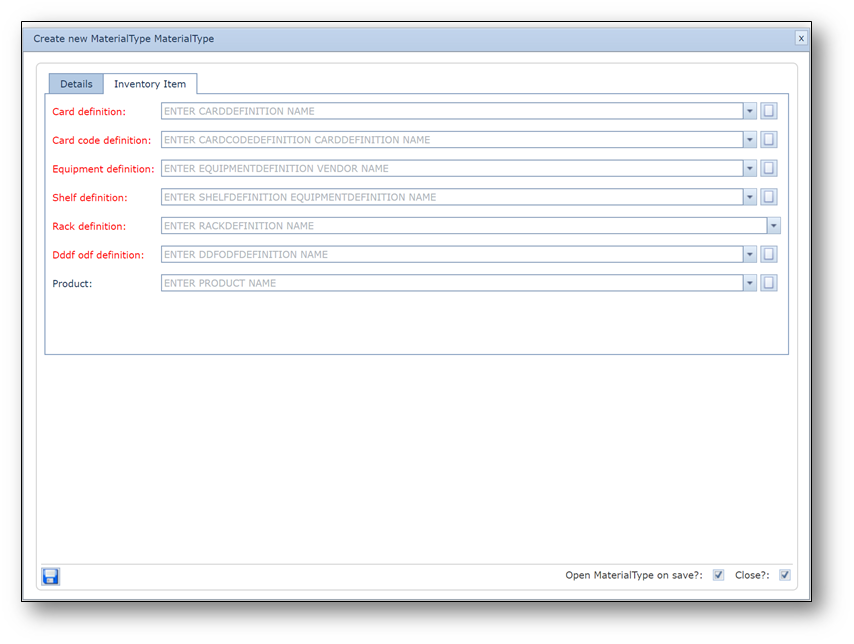
Field name |
Explanation |
Requirements |
Card definition |
Relate material type to a card type |
Optional |
Card code definition |
Relate material type to a card code type |
Optional |
Equipment definition |
Relate material type to a node type |
Optional |
Shelf definition |
Relate material type to a shelf type |
Optional |
Rack definition |
Relate material type to a rack type |
Optional |
Ddf odf definition |
Relate material type to a DDF or ODF type |
Optional |
Product |
Additionally, relate material type to a product code |
Optional |
Create new material template
In IMS Warehouse it is possible to create material templates, these are used to order items that belong to a
certain configuration and should be ordered as a package, f.i. a switch that always has a certain card and
certain SFP’s or a BTS that has a huge list of material items varying from antenna pole’s to generators and
batteries etc.
By creating a material template, all items in such a configuration (or package) can be ordered at once
just by creating the list one time.
Access the Warehouse Material Types form
Warehouse menu button and click Material Template in the list.
On the Material Type form click the button “Create new MaterialTemplate” to open the form to create a
new material template.
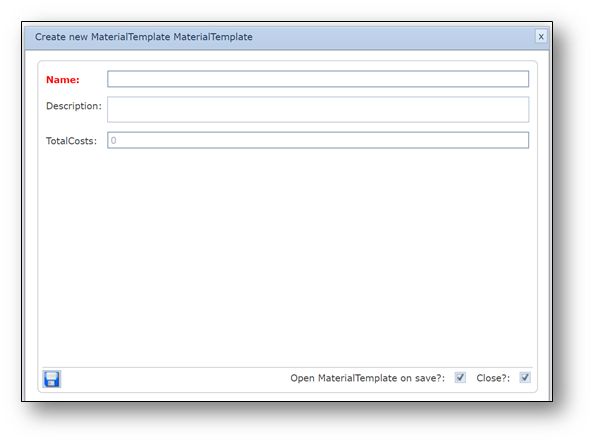
The form contains the following fields:
Field name |
Explanation |
Requirements |
Name |
Name of the template |
Mandatory and unique |
Description |
Description of the template |
Optional |
Total Costs |
The total price of all items in the template |
Optional |
OpenMaterialTemplate on Save |
Checkbox to open the new template after it’s been created |
Yes/No |
Close? |
Close the create screen after the template is created |
Yes/No |
Save |
Save button to save the template |
|
After creating the template, the materials can be added to the template by clicking on the
“Add new material” button, or by adding te materials that are already defined in another template by
clicking the button: “Add materials from template” in which case a list of existing templates is displayed.
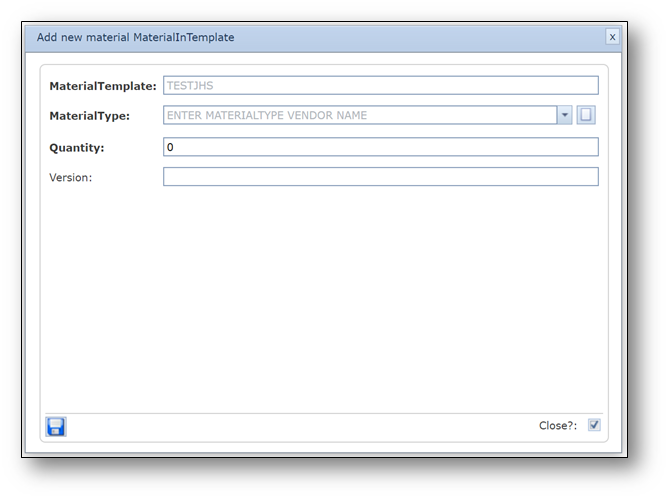
The form contains the following fields:
Field name |
Explanation |
Requirements |
MaterialTemplate |
Name of the template |
Non editable |
MaterialType |
A list of materials per vendor |
Mandatory |
Quantity |
The number of pieces odf the selected material |
Mandatory |
Version |
To specify a specific version of the material |
Optional |
Close? |
Close the create screen after the material is added |
Yes/No |
Save |
Save button to save the material to the template |
|
Create new Warehouse Stock Location
Locations containing one or more material items are called stocks in IMS Warehouse.
One or more of these stocks must be created to manage the ordering, delivery,
reservation and lay out process steps.
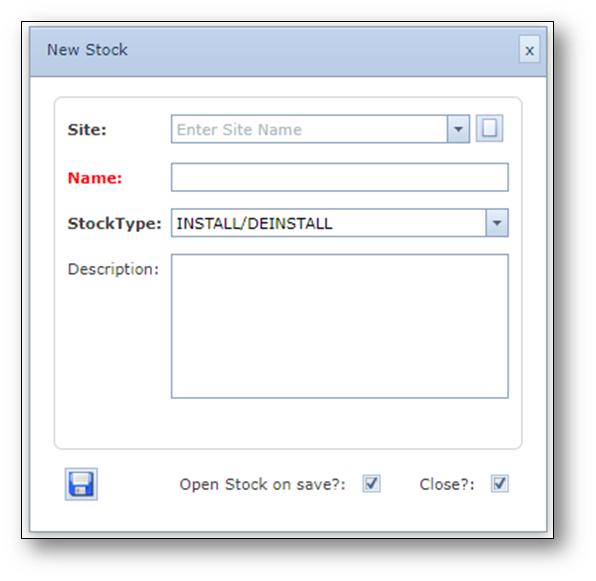
Creating a new stock can be done in IMS by going to the Warehouse button and click Stock in the list.
In the stock form click the New button to create a new stock.
Explanation of the fields:
Field name |
Explanation |
Requirements |
Site |
Site (location) in IMS which is used as stock |
Mandatory |
Name |
Name if the stock |
Mandatory |
StockType |
Field to indicate the type of stock |
Mandatory |
Description |
Description of the stock |
Optional |
|
|
|
Open Stock on Save |
Checkbox to control automatic opening of the new stock on save |
|
Close? |
Checkbox to control the closing of the form on save |
|
Save button |
Button to create the new stock and save it in the IMS warehouse database |
|