Below a description how to find and create the workflow types + queues.
Open Order Type Form
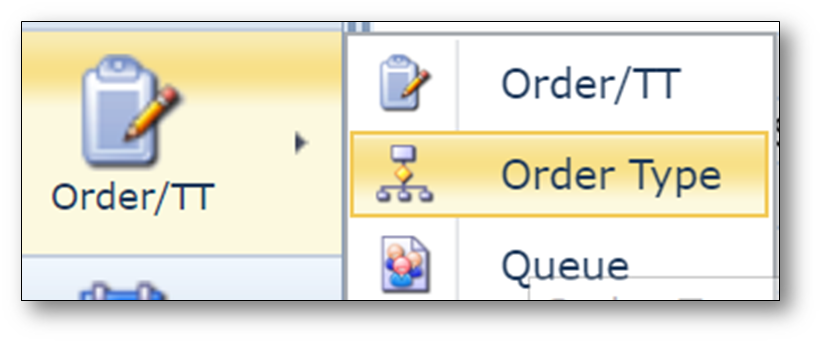
In the IMS menu, a button ‘Order/TT’ is found with 3 sub-menu options:
‘Order’-‘Order type’-‘Queue’
In the Order Type menu, the process flows are defined.
Screenshot: Overview of the Order Type form
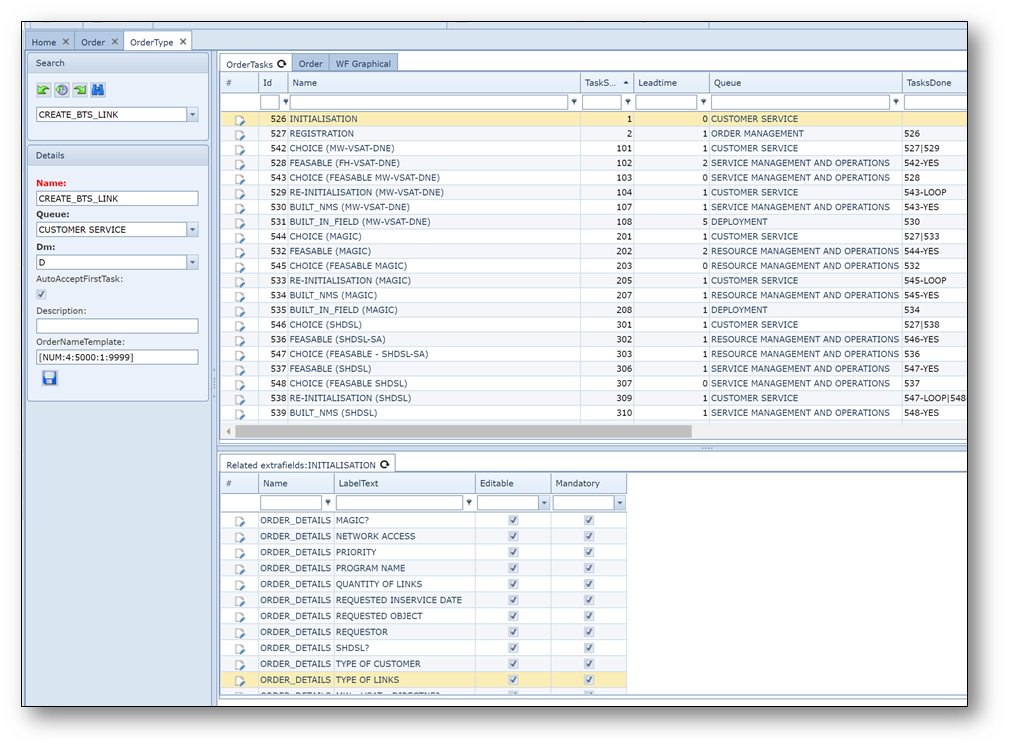
The red box displays:
- the selected process flow
- the primary queue for this flow
- the indicator whether lead times are calculated by days (D) or minutes (M);
- a description (not obligatory;
| - | name template which will be applied for all orders that are configured according to this flow (if no template is desired fill in [NONE] (including the brackets) |
The green area lists all tasks that are configured for this process flow.
This list consists of the following columns:
ID: |
a record ID assigned by IMS |
Name: |
the name of the task |
TaskSort: |
a number to sequentially list the tasks |
Leadtime: |
a number showing the lead time in days or minutes |
Queue: |
the queue in which the task will be executed |
TasksDone: |
the ID of the preceding task(s) |
Description: |
a description of the task |
HoursWork: |
the actual effort to execute the task in hours |
AutoWorkflowFailQueue: |
the name of the queue in which tasks are registered if auto workflow fails |
AutoWorkflowFunction: |
the automatic workflow function to be performed |
AutoWorkflowRelated ObjectsTask: |
the parameters for the automatic workflow |
SkipTask: |
the type of task (behavior) |
Xpos: |
the horizontal position of the task in the graphical representation |
Ypos: |
the vertical position of the task in the graphical representation |
In the yellow area all extra/task fields can be found that have been configured for the selected task in the
green box are found. (see also chapter EXTRA FIELDS).
Creating a new process flow
The menu bar on the top of the form has the following options/buttons:

Copy: |
copy a task |
New Task: |
create a new task |
Relate extrafields to task: |
make a relationship between extra fields and the task |
Copy related extrafields to task: |
make a copy of an existing relationship to another task |
Create new OrderType: |
make a new process flow |
Delete: |
delete an existing process flow |
Close Form: |
close the form |
By clicking on the ‘Create new OrderType’ button the following screen opens:
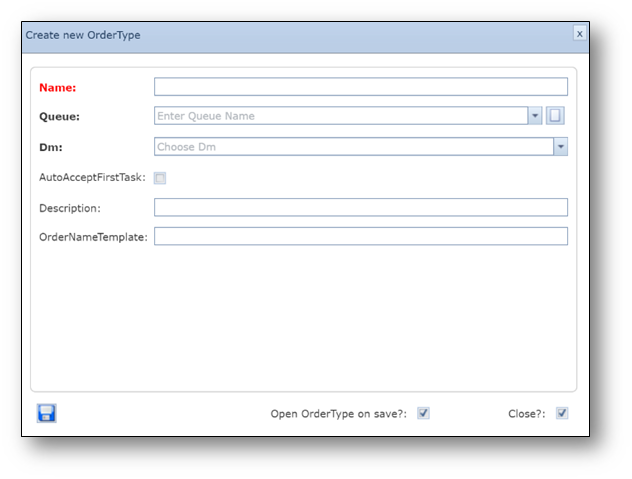
Name: |
the name of the process flow; |
Queue: |
the queue in which the first task will be created; |
Dm: |
calculate lead time in days or minutes; |
AutoAcceptFirstTask: |
check if first task must be accepted automatically; |
Description: |
description of the process flow; |
OrderNameTemplate: |
template for the name of all orders based on this flow |
Creating tasks
After creating the meta data for the process, the tasks can be added.
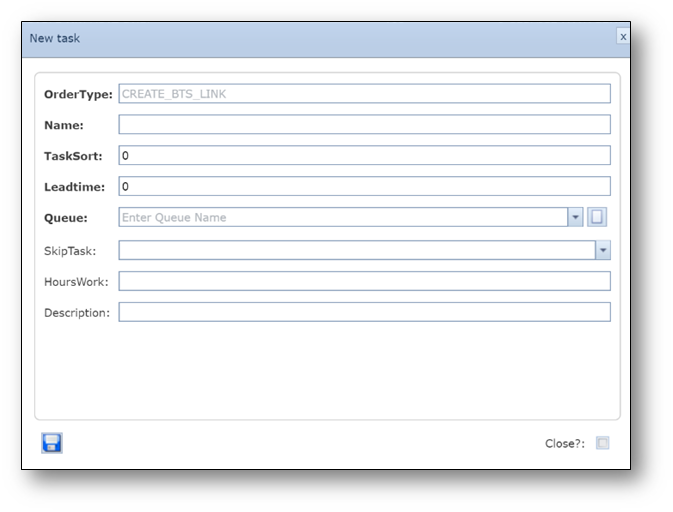
The ‘New Task’ button opens a pop-up window:
OrderType: |
Name of the process flow (already filled); |
Name: |
Name of the task; |
TaskSort: |
Sequential number for ordering the tasks; |
Leadtime: |
Number in days or minutes; |
Queue: |
Queue that should execute the task; |
SkipTask: |
Type of task (NO, YES, YES_NO_LOOP, BACKLOOP); |
HoursWork: |
(Average) effort in hours |
Description: |
Description of the task |
After all tasks are created, the tasks can be related to each other (create the flow).
This can be done in the task matrix by filling in the column TasksDone (for easy sequential flows) or
in the WF Graphical view (for more complex flows)
Via grid/table/matrix:
In the matrix fill in the ID of the preceding task in the TasksDone column
(so for the first task this column remains empty)
Via graphical workflow screen:
In the WF Graphical view first sort the tasks as they will appear all on top of each other in the screen.
Select the task and drag it with the mouse (left mouse button) to the desired position in the flow;
repeat this as many times as necessary until all tasks are in a position that represents the process flow.
To relate the tasks, right-click on a task to open the screen below:
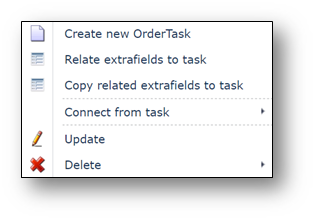
With this pop-up menu the following actions can be performed:
-new tasks can be created;
-extra fields related or copied to a task,
-task can be updated (SkipTask type, description etc.),
-task can be deleted
-task can be related to other task: ‘Connect from task->’ a list with all tasks will open to select
-the task that will precede this task. If the preceding task is a YES_NO_LOOP task, a small arrow
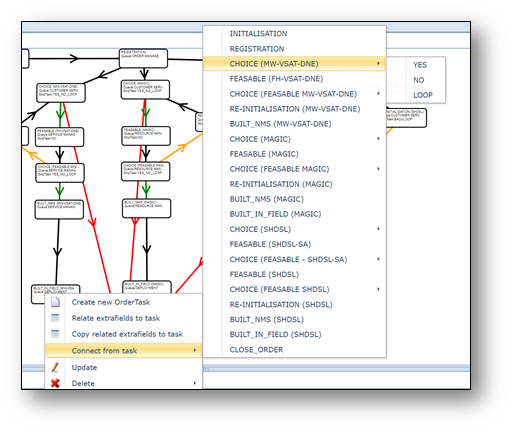
on the right of the task is visible, indicating a further choice; YES, NO or LOOP.
In the graphical representation an arrow will be drawn from the preceding task to the task that was selected:
-Black if it’s a normal sequential flow;
-Red if it represents the NO path,
-Green if it represents the YES path
-Gold if it represents the LOOP path.
Queues
To execute workflow tasks, the users must be member of a queue; i.e. an order (kind of email) box per
department in which the tasks to be executed are announced and which defines the permissions to execute
a task.
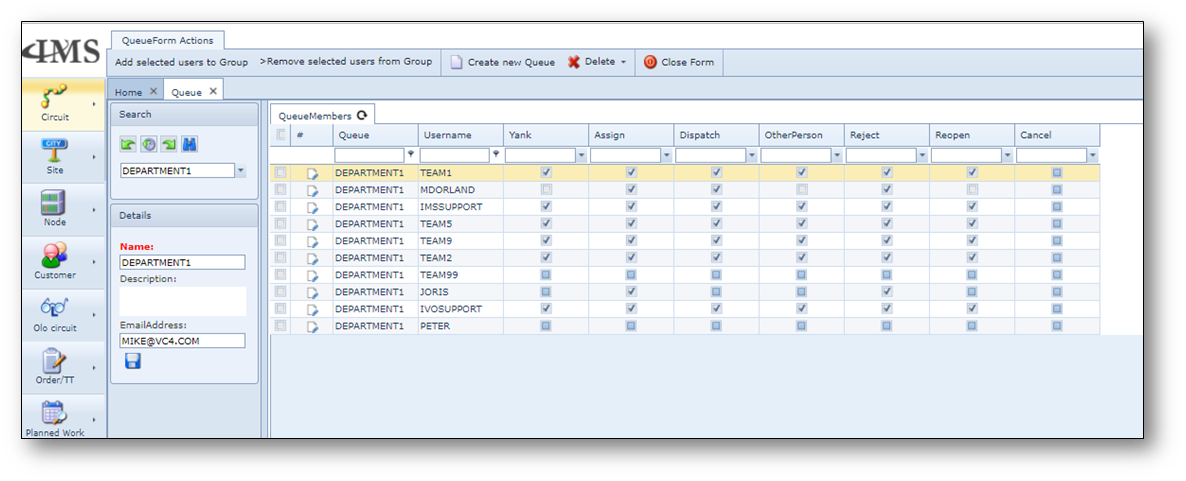
In screenshot above the ‘DEPARTMENT1’ queue is shown and the users who are member of this queue.
Every queue has an email address configured that can be a group address or individual address(es).
Multiple addresses can be inserted by dividing them with a piper symbol “|”.
In the columns next to the user name the authorizations per user are defined:
-Yank: |
the user may grab a task from another user and execute it |
-Assign: |
the user is authorized to assign tasks from the department queue to a user |
-Dispatch: |
the user may dispatch tasks from the department queue to another queue |
-OtherPerson: |
the user may assign tasks to someone outside the department |
-Reject: |
the user may reject tasks |
-Reopen: |
the user may re-open tasks that have already been closed |
-Cancel: |
the user may cancel a complete order |
A user can only create orders/TT if the user is member of the queue that is configured in the order type.
A user can only execute tasks if the user is member if the queue the tasks is assigned to.
Any task can only be executed and closed by the user that has accepted the task or was assigned to the task.
Attention!
Re-opening a task will open the task as if it was not already executed, so all fields can be filled-in again.
Re-open cascade means that the task and all tasks that are in the same flow following that task, will be re-opened;
any decisions, like in yes-no-loop tasks that were already performed, will have to be done again or will be executed
again automatically, based on the new information provided in the task on which the re-open cascade was selected
or in any of the following tasks.